• About Me
  • Awards
  • Breakfast
  • Recipes

Malar's Kitchen

~ My kitchen Experiments

Monthly Archives: August 2014

Modhagam

29 Friday Aug 2014

Posted by Malar in CHettinad food, Food, Recipe, Sweets/Desserts

≈ 23 Comments

Tags

How to make Modhagam, Modhagam, Modhagam Recipe, Pilaiyarpatti Modhagam

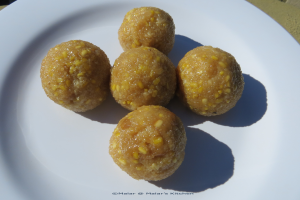
Happy Ganesh Chathurthi dear friends 🙂 Here is a very traditional recipe from my place which is prepared for Lord Ganesha This is not the same as the Modak which is prepared in North India. It is a must that we prepare for Ganesh Chathurthi in my place. If anyone knows about Pillaiyarpatti  in Tamil Nadu where there is a famous Ganesh temple, these modhagam’s are served there on a grand scale.

ModhagamModhagam_1 Modhagam_2

Ingredients:

Raw Rice : 3/4 cup

Moong Dal : 1/4 cup

Grated Coconut : 1/4 cup (fresh preferred)

Jaggery/Gur : 1/2 cup powdered( Please do no use sugar for this, it does not give the exact taste)

Sesame Oil(Gingely Oil) : 5 tablespoons

Water : 1 cup

Cardamom : 3 pieces

Method:

  • Soak raw rice and moong dal separately for 1 hour.
  • After an hour drain of water from rice and grind it to a coarse paste. (just grind for 10 to 15 sec this would be enough)
  • Add 1 to 1 1/2 cup water to it.
  • Heat 2 tablespoons oil in a large pan.
  • When it is hot add the grinded rice with water, jaggery, moong dal ,cardamom pieces and mix well.
  • Continuously stir and make sure no lumps are formed.
  • Add remaining oil slowly for every 3 to 4 mins.
  • It would combine well and form as a dough. Now add the grated coconut and mix. After 2 to 3 mins stop and let it cool.
  • When it is warm, oil palms and make balls out of it.
  • Steam in Idli cooker or any steamer for 10 mins.

Serve it hot 🙂


Advertisement

Share this:

  • Twitter
  • Facebook
  • Tumblr
  • Pinterest
  • Reddit
  • Pocket

Like this:

Like Loading...

More Awards

29 Friday Aug 2014

Posted by Malar in Awards

≈ 22 Comments

Tags

Beautiful Blogger Award, Very Inspiring Blogger Award

It has been really long since I have posted on awards. Sorry friends, I know I am late in posting it. For those awards which I was nominated twice or thrice, I have linked back all your awards to my old posts. Just that I don’t want to dump my friends who already have got these awards.

Here we go with 2 awards which I have not got earlier.

Radhika from My tryst with baking has nominated for Beautiful Blogger Award.

beautiful_blogger_award

Vidhya from Vidhya’s Home Cooking and Nimmi from Adorable Life has nominated for Very Inspiring Blogger Award.

very-inspiring-blogger-award-t-xcnmar

Thank you very much ladies, I am not sure if I am a beautiful blogger or an inspiring blogger. If I am able to inspire someone I am really happy about it. Thank you so much friends for your love.

Beautiful Blogger Award :

  1. Copy the Beautiful Blogger Award logo.
  2. Thank the person who nominated you and create a link back.
  3. Nominate 7 other bloggers and say a little something about them so that they know why you are giving them this award.

I would like to nominate ( in no particular order)

Naina from Spice in the City , Love Naina’s photography. I simply admire her photograph’s which make me drool instantly.

Violets and Vanilla , Cake collection you should definitely visit her blog. She is amazing in cake decoration!!

Nimmi from Adorable Life , Nimmi as well brings in beautiful salads and smoothie’s and make drool for it with beautiful pictures.

Charanya from Yes I am Vegan , my dear vegan friend as I call her , is just so amazing, you should definitely visit her for her lettuce wraps. Anything can be veganized we should learn from Charu 🙂

For Very Inspiring Blogger Award

  • Thank and link to the amazing person who nominated you.
  • Say seven facts about yourself.
  • List the rules and display the award.
  • Proudly display the award logo on your blog and follow the blogger who nominated you.
  • Nominate 15 other amazing blogs and let them know that they have been nominated

Facts about me :

  • I love FRIENDS sitcom which is an energy booster for me, they make me laugh all the time 🙂
  • Paris and Venice is my dream place to visit, I really hope I make it one day to the Eiffel tower 😉
  • As much as I can cook, I hate doing dishes and specially someone else’s plate. My hubby know it well, if he leaves his plate just without realizing he will be kicked off badly 😛
  • During my marriage time I had lost 15 kgs 😉 and now I have gained all of it back 😛
  • Me and my hubby are totally opposite, I am a big time chatterbox and he is extremely quite.
  • I have just started learning to drive car and get lots of scolding from my hubby 😛
  • I met my husband for the first time just 5 days before our wedding 🙂 have just seen him in skype earlier.

My Nomination (in no particular order)

Shruti from Cooking with SJ, she is a great inspiration for me. She knows I am a new blogger, gives me suggestion whenever required. Love her eggless baking. I just adored her Namo cake to a great extent 🙂 Such a sweet person she is 🙂

Chitra from DR CH Diet food , do you want something that looks awesome and totally healthy check Chitra’s page. I admire her for bringing so many healthy food. She is such an inspiration for me.

Shannu from Food Passion and Love, with 3 kids I wonder where on earth she gets time to blog and look at her beautiful recipes, you are so inspiring Shannu!!

Natasha from All Izz Well, I love her positive energy and the way she interprets things. She inspire me of positivity.

Thank you friends to nominate me for these awards. And my nominees no stress to pass on the awards 🙂

Share this:

  • Twitter
  • Facebook
  • Tumblr
  • Pinterest
  • Reddit
  • Pocket

Like this:

Like Loading...

Unsweetened Applesauce

28 Thursday Aug 2014

Posted by Malar in Baking, Food, Recipe, Tips

≈ 21 Comments

Tags

Applesauce, Baking, Eggless Baking, Eggless Baking Tips, how to make unsweetened applesauce, Sweetened apple sauce, Unsweetened Applesauce, unsweetened applesauce recipe

If you are looking to replace eggs in baking, here is the replacement ‘Unsweetened Applesauce’. A very simple and delicious recipe. There were a lot of recipes which called for unsweetened applesauce but I never gave it a deeper thought of preparing 😛 until I found 2 apples in my fridge. So here it is …

Unsweetened_applesauce

Ingredients:

Apple : 2 (peeled and chopped)

Water : 3/4 cups

Vanilla Extract : 1/2 teaspoon

Cinnamon Powder : 1/2 teaspoon

Lemon Juice : 1 teaspoon

Method:

  • Bring water and apples to boil.
  • Add all other ingredients and boil in leave it to simmer for 10 mins with lids on.
  • Heat until 10 mins or till the apple turns soft and then stop.
  • Cool down totally and then blend well to a fine paste. Store in an airtight container in fridge.
  • When ever a recipe calls for unsweetened applesauce use this.
  • If you need sweetened apple sauce add 1/2 sugar to this while boiling.

Simple replacement for eggs in baking 🙂

Share this:

  • Twitter
  • Facebook
  • Tumblr
  • Pinterest
  • Reddit
  • Pocket

Like this:

Like Loading...

Thengai Pal Kozhukattai

27 Wednesday Aug 2014

Posted by Malar in CHettinad food, Food, Recipe, Sweets/Desserts

≈ 20 Comments

Tags

Chettinad Palaharam, Coconut milk rice dumpling, Kozhukattai, Pal Kozhukattai, Pal Kozhukattai recipe, Thengai Pal Kozhukattai

Pal Kozhukattai and Pal Paniyaram are both a Chettinad delicacy. I have never tried both of them, so pestered my grandma for recipe 😛 There are 2 ways of preparing Pal Kozhukattai. I have got the simple one 😉  This is made with coconut milk, so a total vegan recipe. I have used the store bought rice flour. I got the Bob Red Mill’s white rice flour and this is totally good.

I did show her the outcome in skype. She said the rice balls needs to be much smaller than what I had prepared. So I got a bit upset. But the balls turned out really soft and tasted perfect. And hubby gave thumbs up 🙂 So I thought let me share it.

Also when I took pictures, it didn’t come out well 😦 I still have lots and lots to improve in my photography. I want to take pictures and show it the way it comes out naturally and I am still working on it.

Pal_Kozhukkatai_1 Pal_Kozhukkatai_2

Ingredients:

Rice Flour : 3/4 cup

Coconut Grated : 1 1/2 cup

Hot Water :1 cups

Warm Water : 3 cup

Jaggery/Gur : 1/2 cup to 3/4 cups (depending on your sweet cravings 🙂 ) Sugar can be used instead

Cardamom : 3 pieces

Salt : 1 pinch

Method:

  • First coconut milk needs to be prepared. Add 3/4 cup of warm water and grind the coconut in a blender. Remove the first extract in a cup. This the thick coconut milk, keep it aside.
  • Next add the remaining warm water and remove the coconut milk extract. This will be light.
  • Now to the rice flour add salt and mix, then add 3/4 cup hot water and mix with a wooden spatula, so that it forms a nice dough. Don’t mix more water. Cool it down.
  • When it is warm enough make small balls out of it. Make sure to put those balls in a closed container, otherwise it might go dry. If it sticks to your hand, grease your palms with oil and make the balls.
  • Next heat the thin coconut milk. When it is heated well add the rice balls slowly. Make sure the coconut milk is hot, otherwise the rice balls would melt.
  • As well don’t mix with any spatula as soon as you put the balls. Leave it for 5 mins and then stir with spatula.
  • Now add Jaggery or sugar to this.  Add cardamom pieces as well. If you use sugar it will be fully white.
  • Let it boil for 15 mins. Check if the rice balls has got cooked by just pressing it a bit.
  • Don’t boil it too much, otherwise it might go harder.

Stop and serve warm. This does not require any topping 🙂

Pal_Kozhukkatai_ing Pal_Kozhukkatai_ing_1 Pal_Kozhukkatai_making Pal_Kozhukkatai_making_1Pal_Kozhukkatai


Share this:

  • Twitter
  • Facebook
  • Tumblr
  • Pinterest
  • Reddit
  • Pocket

Like this:

Like Loading...

Javvarisi Semiya Payasam/Sabudana Vermiceli Kheer

26 Tuesday Aug 2014

Posted by Malar in Food, Recipe, Sweets/Desserts

≈ 22 Comments

Tags

how to make simple kheer, Javvarisi Payasam, Javvarisi Semiya Payasam, Sabudana Kheer, Sabudana vermiceli kheer, Semiya Payasam, simple kheer recipe, simple payasam recipe, Tapioca Pearl Pudding

Today it is going to be a simple and a delicious recipe. This is a long pending post, prepared this payasam for Varalakshmi Pooja and I am posting it now 😛 A very commonly made recipe for all special occasions in South India.

Javvarisi_Payasam_1 Javvarisi_Payasam_2

Ingredients:

Javvarisi/Sabudana/Tapioca Pearl : 1/3 cup

Vermiceli/Semiya : 1/2 cup

Milk : 2 cups

Cardamom : 2 pieces

Sugar : 1/2 cup

Nuts and Raisins : Few

Ghee : 1 teaspoon

Water : 1/2 cup

Method:

  • Soak Javvarisi for 2 hours in water just to cover till the top. After 2 hrs drain off any excess water if present.
  • I used roasted vermicelli. If you are using plain vermiceli, add a teaspoon of ghee in a pan and roast vermiceli till golden brown.
  • Next Heat water in a large pan. Add Javvarisi/Sabudana and boil in medium for 5 mins, until they turn transparent.
  • Now add the roasted vermiceli with sabudana and boil till soft. You can check it by piercing a piece of vermiceli.
  • Next add milk and boil it. Add the cardamom pieces by removing skin. You can use powder of cardamom as well.
  • It would get thicker in 10 mins, add sugar as well. Heat should be in medium.
  • In another pan, heat ghee and roast the nuts and raisins. Add this to the kheer/Payasam. And stop heating.

Serve warm.

It would get thicker after you store it. At that time we can add some extra milk and serve.


Share this:

  • Twitter
  • Facebook
  • Tumblr
  • Pinterest
  • Reddit
  • Pocket

Like this:

Like Loading...

Quinoa Patties (Baked)

25 Monday Aug 2014

Posted by Malar in Food, Recipe, Snack

≈ 36 Comments

Tags

Baked Quinoa Patties, eggless patty recipe, healthy patties, Quinoa, Quinoa Patties, Qunioa Patty recipe, Vegan patties, Vegan Quinoa Patties

Call it Quinoa Patties/Kebabs whatever I loved these 🙂 You can very much have it with burger or as a tea time snack. Perfect for both 🙂 . This is a long pending recipe on my list after Sabudana Vada. Finally today I got time to prepare this. Quite a simple recipe and loved the way it turned out. Also I gave the Indian Spice touch 🙂

Baked_Quinoa_Patties_3

Ingredients:

Quinoa : 1/2 cup (uncooked)

Water : 3/4 cup

Black Eyed Chickpea : 1/3 cup soaked overnight (You can use normal chickpea as well)

Spinach : 1 cup (finely chopped)

Carrot : 1 grated

Onion : 1/2 of a large chopped

Green Bell Pepper : 1/2 of a large chopped

Cilantro leaves : 15 to 20 strands chopped

Ginger Garlic Paste : 1 teaspoon

Oil : 1 teaspoon

Cumin Seeds : 1/2 teaspoon

Fennel Seeds : 1/2 teaspoon

Garam Masala : 1 teaspoon

Turmeric Powder : 1/4 teaspoon

Pepper Ground : 2 teaspoons

Salt : 2 teaspoon

Method:

  • Bring Quinoa and water to boil and simmer it for 6 minutes. Switch off, close it with lid for 20 minutes. By this time it would have got cooked completely.
  • Boil black eyed chickpea, in water until it is very soft. Cool down and grind it to a fine paste in a blender. Set aside.
  • Heat oil in a pan, add cumin seeds, fennel seeds when they crackle, add onion and ginger garlic paste, saute till translucent. Next add green bell peppers and saute for 2 minutes. Next add grated carrots and then spinach in every 2 mins time. Then add garam masala, pepper powder, turmeric powder, salt to this and mix well.
  • Now mix the cooked quinoa, mashed up black eyed chickpea, and the above veggie mix and combine well.
  • Meantime preheat oven to 425 F, grease a baking sheet with oil.
  • Oil your palms and make round patties.
  • Bake for 40 mins. After 20 mins, flip sides and bake.
  • If you feel that they don’t stick well together, dust the made patties with chickpea flour and then bake. I didn’t use it but when flipping sides, few of them did get distorted from shape. So better to use flour.

Quinoa_Patty_Batter

If you want it much crispier, change temperature to 450 and bake 🙂

You can pan fry it as well. Just to avoid more oil consumption I baked it.

For the above mentioned quantity I got around 12 patties.

Baked_Quinoa_Patties Baked_Quinoa_Patties_1 Baked_Quinoa_Patties_2


I know I am a bit late for Fiesta Friday, as I had planned some other dish and now turned up to this 🙂 Hope you enjoyed this friends 😀

Share this:

  • Twitter
  • Facebook
  • Tumblr
  • Pinterest
  • Reddit
  • Pocket

Like this:

Like Loading...

Banana Coffee Cake (Whole Wheat Flour)

24 Sunday Aug 2014

Posted by Malar in Food, Recipe, Snack, Sweets/Desserts

≈ 29 Comments

Tags

Banana Cake, Banana Coffee Cake, Banana Walnut Coffee Cake, Coffee Cake, Coffee Cake recipe, Wheat Flour Coffee Cake, Whole Wheat Flour Banana Cake, Whole Wheat Flour Banana walnut coffee Cake

Recently many of my friends have been posting on Banana cake and coffee cake. I always wanted to make one. Also a dear friend of mine had requested for this recipe in Facebook. So its my turn now 🙂

As always I tried with whole wheat flour. Though it was not so very moist and the look was quite not appealing I would say 😦 I got a bit upset by looking at it when I took it out of the oven. To my surprise the taste was awesome and my hubby is munching pieces often 😛 I am now happy with the outcome 😀

Banana_Cake_1

Dry Ingredients

Whole Wheat Flour : 1 1/2 cup

Salt : 1/4 teaspoon

Nutmeg Powder : 1/4 teaspoon

Cardamom Powder : 1/4 teaspoon

Cinnamon Powder : 1/4 teaspoon

Baking Powder : 1 teaspoon

Walnut : 1/4 cup (chopped)

Wet Ingredients

Banana : 3 (Fully ripen)

Egg : 1 (optional, I used it as I have so many in fridge :P)

Vanilla Extract : 1 teaspoon

Milk : 1/4 cup

Baking Dates : 1/2 cup or Sugar(Dark/White/Brown) : 1/2 cup ( I used Dates)

Oil : 1/4 cup ( I used olive oil)

Method:

Preheat oven to 350F and grease baking tray wit oil or butter.

Mix all dry ingredients together. Have few walnut to dress on top.

In a blender blend all wet ingredients to a fine semi watery paste. I got around 2 cups.

Now mix dry and wet together.

Pour batter in baking tray. Next drizzle the remaining walnut over them.

Bake for 35 mins or until tooth pick comes out clean.

Cool for 20 mins.

Sorry for the poor presentation friends 😛 I was not happy with the look , but taste is just wow and cardamom powder in this gave an excellent taste.

Banana_Cake_3 Banana_Cake_2 Banana_Cake


Share this:

  • Twitter
  • Facebook
  • Tumblr
  • Pinterest
  • Reddit
  • Pocket

Like this:

Like Loading...

Methi Dhal/Fenugreek Leaves Lentil Gravy

23 Saturday Aug 2014

Posted by Malar in Food, Gravy, Recipe

≈ 23 Comments

Tags

Andhra Pappu, Andhra style pappu recipe, Daal recipe, Fenugreek leaves, Methi Daal, Methi Daal recipe, Methi Dhal, Methi Recipe

Methi leaves/Fenugreek leaves is a must in my grocery list when I visit Indian grocery. I got to learn this recipe from my room mate. She is from Rajamundry of Andhra Pradesh. I love Andhra food( I guess most of us in South India loves 🙂 ) and specially the pappu which is served in their menu is just awesome. Vegetarians like me used to have 2 to 3 rounds of this pappu and rice 😉

I used to get methi, pluck it from the stalks and wait for my roomie to prepare this pappu. She is quite a busy bee , an alumni of BITS Pilani!! Now you can understand how work alcoholic this lady is. But I have never got such a wonderful room mate ever, she is the best. It is usually me who cooks and what ever blunder I prepare, she never used to complain 😛 so sweet of her 😀 Once she taught me how to prepare this dish, but somehow when I prepared it, I couldn’t get the same taste as how she prepares it. When I asked her, she told me that I might have reduced the tamarind size and yes, she was right. Tamarind in this dish gives it an excellent taste. So here is the Andhra style recipe 🙂

Methi_Dal_1

Ingredients:

Methi Leaves/Fenugreek Leaves : 2 bunches ( 3/4 cups)

Toor Dhal/Pigeon Pea : 1/2 cup

Green Chili : 2

Turmeric Powder : 1/8 teaspoon

Tamarind : 1 Lemon size (make juice out of it measure this as well along with water)

Water : Just to cover till it fills the top of all above

Onion: 1/2 of large

Garlic : 5 to 6 large pods

Salt : 1/2 teaspoon

To Temper:

Oil: 1 teaspoon

Mustard Seeds : 1/2 teaspoon

Urad dal : 1/2 teaspoon

Cumin Seeds : 1/2 teaspoon

Asafoetida : 1/4 teaspoon

Red Chili : 1 to 2

Method:

  • Wash Fenugreek Leaves thoroughly and roughly chop them.
  • Next wash toor dal and drain of water. Add the fenugreek leaves, tamarind juice with water, green chili and turmeric powder with the toor dal and pressure cook it for 6 whistles.
  • Let it cool down. Once done mash them totally and add salt.(I didn’t mash it well :P) Now mix it well.
  • Heat oil in a pan, when hot add mustard seeds, urad dal, Cumin seeds, asafoetida and broken red chili. When it crackles add the chopped onions and garlic and mix well. When garlic turns a little golden color , add this tadka to the dal/lentil cooked above.

Serve with rice or roti 🙂

Methi_Dal

Simple and easy recipe. It takes time to remove the leaves from stalk, only this is time consuming. We both used to have it with Rice, pickle and papad 🙂 yum!! I missing those days badly…. I am not sure if she has time to read this post as now she is totally busy in her new office at UK 🙂 , I dedicate it to her 🙂


Share this:

  • Twitter
  • Facebook
  • Tumblr
  • Pinterest
  • Reddit
  • Pocket

Like this:

Like Loading...

Mango Clafoutis

20 Wednesday Aug 2014

Posted by Malar in Food, Sweets/Desserts

≈ 36 Comments

Tags

Clafoutis, Clafoutis recipe, French Desserts, how to make simple clafoutis, Mango, Mango Clafoutis, Mango Desserts, Mango Recipes

Clafoutis is a French baked dessert, usually made with cherries. It is made with variation of many fruits. When you bake a clafoutis, it will puff up like a little souffle, browned on the edges, but creamy within. I had more mangoes left , so tried this recipe.

Sorry my dear vegan and vegetarian friends, this has 3 eggs 🙂

Mango_ClafoutisMango_Clafoutis_1Mango_Clafoutis_2

Recipe adapted from Willy Street

Ingredients:

Mango : 1 to 2 chopped to pieces

Oats Flour : 1/2 cup ( Original recipe requires all purpose flour, I changed it to oats flour)

Salt : 1/2 teaspoon

Dark Brown Sugar : 1/2 cup packed

Milk : 1 1/2 cup

Vanilla Extract : 1 teaspoon

Eggs : 3

Method:

  • Grease the baking tray and preheat oven at 375 F
  • Place(spread) the chopped mango in the baking tray.
  • Add oats flour, dark brown sugar, salt and mix in a medium bowl. (dry ingredients)
  • Whisk milk, egg and vanilla extract well.(wet ingredients)
  • Add dry and wet ingredients together.
  • Pour this over the chopped mangoes.
  • Bake for 50 mins, sides would get dark and middle soft.(until tooth pick comes out clear)

Mango_Cla_ing Mango_Claf_ing Mango_Claf_ing_1Mango_Clafoutis_3

Serve warm 🙂 Though it is a dessert, I like to have it for breakfast. Egg taste in this is a little dominant. My hubby had this like a sandwich , placing between bread slices 😛 and he said it tasted good that way. I loved it for breakfast 🙂


Share this:

  • Twitter
  • Facebook
  • Tumblr
  • Pinterest
  • Reddit
  • Pocket

Like this:

Like Loading...

Coconut Rice Porridge and Coconut Dip/Thengai Kanji and Thengai Thuhayal

19 Tuesday Aug 2014

Posted by Malar in Food, Health Tips, Recipe

≈ 18 Comments

Tags

Coconut dip, Coconut Milk recipe, Coconut Porridge, Coconut rice porridge, food to cool down body heat, food to have while dysentery, food to have while loose stomach, Rice Porridge, Simple rice porridge recipe, Thengai Kanji, Thengai Pal Kanji, Thengai Thuhayal

This food is the most comfort food on earth I feel and it tastes heavenly and comes with lots of health benefits. If you have any digestion issues and heavy dysentery, vomiting, acidic problem the very comfort food is this. Coconut milk cools down body heat as well. We have yogurt/curd rice in competition with this, but I would go for thengai kanji any time 😉 I love this so much that I can have it anytime. And a vegan 🙂 So my vegan friends would be happy to see this.

Thengai_Kanji+Thengai_Thuhayal

Ingredients:

For Thengai Kanji/Coconut Rice Porridge

Raw rice : 1 cup

Water :  4 cups

Garlic : 12 to 15 pods

Fenugreek Seeds : 1/2 teaspoon

Coconut Milk : 1 to 1 1/2 cup ( I prepare fresh coconut milk which is preferable)

Salt : 1/2 teaspoon

For Coconut dip/Thengai Thuhayal

Fresh Grated coconut : 1/4 cup ( frozen is as well fine)

Red chili : 1

Garlic :2 pods

Roasted Gram/Pottukadalai : less than 1/4 cup

Water and salt : as required

Method:

To prepare Thengai Kanji/Coconut Rice Porridge

Take raw rice and in a blender just mince for 10 seconds, not more than that, so that it splits to half size.

Next in a pressure cooker, add this cup of broken rice, water, garlic pods chopped, fenugreek seeds and pressure cook for 3 to 4 whistles. Let it cool down.

Meantime to prepare coconut milk, add 1/4 cup of fresh scraped coconut and add little water and blend it to fine paste. Now pour around 1 cup of water to it and blend well. Filter this you get fresh coconut milk.

After rice cools down, add salt and coconut milk. It smells heavenly 🙂 Serve it at room temperature.

Thengai_Kanji_Making Thengai_Kanji_Making_1 Thengai_Kanji_Making_2

To Prepare Coconut dip/Thengai Thuhayal

Add fresh scraped coconut, garlic pods, red chili, roasted gram, salt and use water only as much to make the dip/thuhayal and grind it.

It is so simple and has great health benefits without compromising taste. These are so perfect with each other 🙂

Share this:

  • Twitter
  • Facebook
  • Tumblr
  • Pinterest
  • Reddit
  • Pocket

Like this:

Like Loading...
← Older posts
Follow Malar's Kitchen on WordPress.com

Enter your email address to follow this blog and receive notifications of new posts by email.

Facebook Page for Malar’s Kitchen

Facebook Page for Malar’s Kitchen

Follow me on Twitter @malarskitchen

My Tweets

All Cooking Sites

All Cooking Sites

Indi Blogger

IndiBlogger - The Largest Indian Blogger Community

myTaste.in

myTaste.in

SheBlog

Smart Indian Women

Very Good Recipes

Very Good Recipes
You can find my recipes on Very Good Recipes

Taste Query

Tasty Query - recipes search engine

Snapshots

This slideshow requires JavaScript.

Categories

  • Awards
  • Baking
  • Beverages
  • Biriyani
  • CHettinad food
  • Food
  • Gravy
  • Guest Post
  • Health Tips
  • Indian Breakfast
  • Paratha/Roti
  • Recipe
  • Rice
  • Side Dish
  • Snack
  • Sweets/Desserts
  • Tips
  • Uncategorized

Archives

  • January 2018 (1)
  • December 2017 (1)
  • April 2016 (1)
  • December 2015 (3)
  • November 2015 (4)
  • October 2015 (3)
  • May 2015 (1)
  • April 2015 (10)
  • March 2015 (9)
  • February 2015 (12)
  • January 2015 (11)
  • December 2014 (2)
  • November 2014 (3)
  • October 2014 (12)
  • September 2014 (20)
  • August 2014 (25)
  • July 2014 (31)
  • June 2014 (24)
  • May 2014 (20)
  • April 2014 (8)
  • March 2014 (11)
  • February 2014 (5)
August 2014
M T W T F S S
 123
45678910
11121314151617
18192021222324
25262728293031
« Jul   Sep »

Foodie Blogger

The Foodie Blog Roll

Blog at WordPress.com.

Privacy & Cookies: This site uses cookies. By continuing to use this website, you agree to their use.
To find out more, including how to control cookies, see here: Cookie Policy
  • Follow Following
    • Malar's Kitchen
    • Join 380 other followers
    • Already have a WordPress.com account? Log in now.
    • Malar's Kitchen
    • Customize
    • Follow Following
    • Sign up
    • Log in
    • Report this content
    • View site in Reader
    • Manage subscriptions
    • Collapse this bar
 

Loading Comments...
 

    %d bloggers like this: