• About Me
  • Awards
  • Breakfast
  • Recipes

Malar's Kitchen

~ My kitchen Experiments

Category Archives: Side Dish

Vazhaipoo thugayal/Banana Flower petal chutney

13 Wednesday Apr 2016

Posted by Malar in Food, Gravy, Health Tips, Recipe, Side Dish

≈ 9 Comments

Tags

Banana Flower Chutney, banana flower petal chutney, chutney recipes, Vazhai poo thugayal, Vazhaipoo chutney, vazhaipoo thokku

Hello friends,

Been really long, absolutely no time to check my blog. Have been thinking of posting, ain’t got time to write down a post. Have some pictures taken and been there in the memory card. Little one is growing fast and I am going around her where ever she crawls. This gets the mommy tired 🙂 Anyways lets get to this recipe. This is a recipe from my dear friend PM’s mom. When she told me that is she going to make this thugayal, I got fascinated and loved the recipe. I wanted to try immediately and absolutely loved the taste. This recipe is one of the treasured recipes from her mom.

PM this is dedicated to your mom 🙂

Vazhaipoo_thugayal Vazhaipoo_thugayal_1 Vazhaipoo_thugayal_ing Vazhaipoo_thugayal_ing_1

Here it goes, remove the banana flowers and when you get to the stage you can remove anymore, just cut it in half. Use the petals which are soft. Discard those which has more fiber and can’t cut.

Ingredients:

Banana Flower and petals of medium size

Tamarind : a small piece

Salt : 1/4 teaspoon

Oil : 3 to 4 table spoons

Red Chili : 2 to 3

Asafoetida/Hing: 1/8 teaspoon

Urad dal :1/4 teaspoon

Garlic : 20 pods

Mustard seeds : 1/4 teaspoon

Water : as needed

Curry Leaves: Few

Method:

  • Throw the banana flower and the petals in a pressure cooker, add salt, tamarind and some water and cook for 3 whistles.
  • In a small pan, heat some oil, add urad dal, red chili, hing. Once it cracks, let it cool.
  • Take out the pressure cooked flower, petals, add the above and grind it to a fine paste.
  • Next heat the remaining oil, add mustard seeds and curry leaves.
  • Add garlic once they start to brown, add the paste and mix well.
  • Cook in low flame until it thickens.

Serve with idli/dosa.

My friend told me that , they prepare it for ladies who delivered babies. This helps cure the internal injury in new moms. As you know Banana flower is full of iron content. Though it is a little long process, it is absolutely worth it. This tastes so good. Do give it a try. You can store it for a week as we have loads of oil. Use it as thokku.

Advertisement

Share this:

  • Twitter
  • Facebook
  • Tumblr
  • Pinterest
  • Reddit
  • Pocket

Like this:

Like Loading...

Cranberry thokku

02 Wednesday Dec 2015

Posted by Malar in Food, Gravy, Recipe, Side Dish

≈ 16 Comments

Tags

Cranberry Indian Recipe, Cranberry Indian style pickle, Cranberry Indian Style recipe, Cranberry Thokku, easy thokku recipe

I wanted to make this thokku last year itself but missed it. Cranberries are easily found during Thanksgiving season. When I went to Walmart before Thanksgiving this year, I got a pack of cranberries for $1.68. Last year this time I was pregnant and had urinary infection, which is very common during pregnancy. Cranberry helps a lot in reducing UTI. I used to make juice with apple. But it was too bitter and I gave up fresh cranberries lol. So I used to make dry fruits bar/energy bar with dried cranberries. This year again I got so tempted by seeing the price. Finally made this thokku. It is way better than juice, so you can try it ☺

This is not my own recipe, adapted from here. I have never found these beauties in India.

Cranberry_Thokku Cranberry_Thokku_1 Cranberry_Thokku_2

Ingredients:

Cranberries: 2 cups
Turmeric powder: 1/4 teaspoon
Red chili powder: 2 teaspoon (adjust according to your taste)
Salt : 1 teaspoon
Oil: 2 tablespoons
Tamarind juice: 2 tablespoons

Method:

  • Wash cranberries and set aside.
  • Heat oil in a large pan. When hot add the cranberries. It would start popping, just be careful.
  • When they bubble up and get cooked. Add turmeric powder, red chili powder, salt and give it a nice mix.
  • After 2 to 3 mins, add tamarind juice and mix well.
  • Let it cook and oil gets separated on the edges of the pan.
  • Now stop and cool. Store in a mason jar in refrigerator for 2 weeks.

It goes well with idli, dosa, chappathi and with rice.

Optionally you can make tadka with little oil, mustard seeds, urad dal, asafoetida, curry leaves. I didn’t want to add more oil, so didn’t do this step.

Share this:

  • Twitter
  • Facebook
  • Tumblr
  • Pinterest
  • Reddit
  • Pocket

Like this:

Like Loading...

Potato Fry/ Urulai Poriyal

29 Thursday Oct 2015

Posted by Malar in Food, Recipe, Side Dish

≈ 10 Comments

Tags

Bachelor recipe, Indian bachelor recipe, Indian Style Potato Fry, Potato Fry, Urulai Kilangu varuval, Urulai Poriyal

We all love potatoes, who doesn’t 😛 . This is an universal recipe in many Indian families. Quick and easy to make. It is not there in my blog yet. So I thought why not take some pictures one day when i prepared. So here it is. There is one secret ingredient which brings more taste to this dish. I got to know from my dear friend Vidya @ Traditionally Modern Food. It gives crispy and tasty potato Fry.

Potato_Fry_1 Potato_Fry

Ingredients:

Potato: 2 to 3 medium
Oil : as required to fry
Mustard seeds: 1/4 teaspoon
Urad dal: 1/4 teaspoon
Cumin Seeds: 1/4 teaspoon
Curry leaves : few
Rice floor: 1 tablespoon
Salt : as required
Turmeric powder: a generous pinch

Method:

  • Slice potatoes to small pieces. Put the sliced pieces in water to avoid getting dark.
  • Heat oil in a pan, when hot add mustard seeds, urad dal, cumin seeds.
  • When they crackle, add curry leaves. Once they splutter add the sliced potatoes by draining the water.
  • Saute for 3 to 4 mins.
  • Next add the rice flour, turmeric powder, salt.
  • Mix well and let it cook. If needed sprinkle water and cook.
  • Once done, stop and serve.

Rice flour gives crispiness and an excellent taste. It can totally be avoided in case you don’t want to use.

Share this:

  • Twitter
  • Facebook
  • Tumblr
  • Pinterest
  • Reddit
  • Pocket

Like this:

Like Loading...

Muttai Poriyal/Egg stir Fry

26 Thursday Mar 2015

Posted by Malar in Food, Indian Breakfast, Recipe, Side Dish

≈ 26 Comments

Tags

easy muttai poriyal, egg masala poriyal, Egg Stir Fry, how to make muttai poriyal, Indian style egg recipe, muttai poriyal

I grew up as a vegetarian. Occasionally I take eggs, an exception in my vegetarian diet 😉 . I do add them in baking. My hubby doesn’t mind eating eggs often as it is a good source of protein. But I can only make Indian style egg gravy and don’t know many options with egg. This was one of his recipes which I learnt. He makes it much spicier than I do 😉 So a recipe from my hubby’s book 🙂

muttai_poriyal muttai_poriyal_1 muttai_poriyal_2

Ingredients:

Eggs: 6

Onion : 1/2 of a large chopped

Green Chili : 2 small chopped finely

Ginger : a small piece crushed

Turmeric Powder : a generous pinch

Pepper Powder : 1 teaspoon

Oil : 1 1/2 teaspoon

Mustard Seeds : 1/4 teaspoon

Urad Dal : 1/4 teaspoon

Curry Leaves : Few

Cilantro Leaves : Few

Salt : as needed

Method:

  • Break eggs and whisk well in a bowl.
  • Heat oil in a pan. When hot add mustard seeds, urad dal.
  • When it crackles, add curry leaves. When it splutters, add chopped onions, green chili, ginger.
  • Add turmeric powder and mix. Keep the heat in low medium.
  • Saute well for 2 mins.
  • Now add pepper powder, salt and saute for 2 more mins.
  • Now add the whisked eggs.
  • Mix well, make sure heat is in low medium.
  • Keep cooking until eggs combines well.
  • At one stage, egg gets cooked and you can touch and see the soft fluffy eggs.
  • Stop and add cilantro leaves.
  • Do not cook more time eggs may turn rubbery.
  • Goes well with rice. I served with rasam rice 🙂

You can vary with red chili powder. Taste changes a bit different. It can served with bread for breakfast as well.


Share this:

  • Twitter
  • Facebook
  • Tumblr
  • Pinterest
  • Reddit
  • Pocket

Like this:

Like Loading...

Rasam –(without rasam powder)

24 Tuesday Mar 2015

Posted by Malar in Food, Recipe, Side Dish

≈ 30 Comments

Tags

Easy rasam recipe, how to make rasam, Instant rasam, Rasam, rasam for sore throat, Rasam without rasam powder, recipe for sore throat, South Indian Style Rasam, Toor Dal Rasam

Rasam is an inevitable food in south India. When my friends say that I can’t prepare rasam as I don’t have rasam powder stock at home, I always ask them to prepare this recipe. When anyone gets cold this is the best food to be prepared. This soothes the throat so well.

rasam rasam_1

Ingredients:

Tamarind : a small lemon size

Tomato : 1

Garlic : 4 pods

Black Pepper: 3/4 tablespoon

Cumin Seeds : 3/4 tablespoon

Water : 3 cups

Toor Dal : 2 tablespoons

Turmeric Powder : a pinch

Oil : 1 1/2 teaspoon

Mustard Seeds : 1/2 teaspoon

Urad dal : 1/2 teaspoon

Curry Leaves : Few

Cilantro Leaves: Few

Salt : as needed

Method:

  • Soak tamarind in 1/4 cup of water.
  • Cut tomato into 2 halves.
  • Boil toor dal with required water and turmeric powder. Once cooked well, stop and set it aside.
  • In blender, add cumin seeds, black pepper, garlic pods and one half of tomato. Blend it to a fine paste.
  • Take tamarind juice, add the above ground paste, salt.
  • Add the remaining half of tomato and smash with hands.
  • Add around 1 1/2 cup water and get the liquid consistency. Check for salt.
  • In a pan heat oil, add mustard seeds, urad dal. When it crackles add curry leaves.
  • Now add the the rasam water prepared, let it boil.
  • When it starts boiling add cooked toor dal and let it get boiled for 2 mins.
  • Switch off and add cilantro leaves and mix.
  • Now rasam is ready. Have it with hot rice 🙂

Share this:

  • Twitter
  • Facebook
  • Tumblr
  • Pinterest
  • Reddit
  • Pocket

Like this:

Like Loading...

Kothamalli Thokku/Coriander Thokku

21 Saturday Mar 2015

Posted by Malar in Food, Recipe, Side Dish

≈ 24 Comments

Tags

Cilantro, cilantro leaves, Cilantro thokku, Coriander Leaves Pickles, Coriander Thokku, Kothamalli Thokku, South Indian Thokku, thokku recipe

Kothamalli thokku is one of my favorite. Recently there was an offer of 5 large bunches for 1$, so purchased it with no hesitation 😉 My hubby was like what will you do with so much of cilantro. I said let me make thokku. So here it is 🙂 Not a new recipe today, just a traditional one.

Kothamalli_Thokku_2 Kothamalli_Thokku_1 Kothamalli_Thokku

Ingredients:

Cilantro/Kothamalli : 5 cups packed

Urad dal : 3 tablespoons

Red Chili : 4

Tamarind : one lemon sized

Salt : as required

Water : as required

Oil : 3 tablespoons( I prefer sesame/gingely oil)

Asafoetida/Hing: 1/4 teaspoon

Mustard Seeds : 1/4 teaspoon

Method:

  • Wash and dry the cilantro leaves in paper towel to absorb the excess water.
  • Cut the thick stems(end portion of cilantro) just a bit, not too much.
  • Heat 1 tablespoon oil in a pan, when hot add urad dal, red chili, asafoetida and tamarind.
  • Saute till nice golden brown color.
  • Stop and let it cool.
  • Once cool, grind the above along with cilantro leaves , salt and required water to a fine paste.
  • Do not add too much of water, just enough to make a paste.
  • Now heat remaining oil in a large pan. When hot add mustard seeds.
  • When it crackles, add the ground paste.
  • Keep stirring , it will get cooked.
  • In case it gets stuck at the bottom or burnt, add more oil , mix and cook.
  • At one stage it will come together without sticking to the sides of the pan.
  • Now thokku is ready. Store in an air tight container in refrigerator.

Serve with either rice, roti, idli or dosa. I have used much less oil than I have mentioned above 😉 You can always increase oil, so the shelf life also increases.

Share this:

  • Twitter
  • Facebook
  • Tumblr
  • Pinterest
  • Reddit
  • Pocket

Like this:

Like Loading...

Peerkangai thol thugayal/Ridge Gourd Peel Chutney

10 Tuesday Mar 2015

Posted by Malar in Food, Indian Breakfast, Recipe, Side Dish

≈ 31 Comments

Tags

easy Indian Chutney recipes, Indian Chutney, Indian Chutney recipes, peerkangai skin chutney, Peerkangai thol thugayal, ridge gourd, Ridge Gourd chutney, Ridge gourd skin health benefits, Ridge Gourd skin peel, Ridge gourd skin peel chutney, south Indian breakfast, South Indian Style chutney, tasty chutney

Do you throw away the skin peel of ridge gourd? They are extremely rich in dietary fiber and low in calories. Do not throw them away. You can make this easy and tasty chutney which is great with any south Indian breakfast.

Ridge_Gourd_Skin_Chutney Ridge_Gourd_Skin_Chutney_1 Ridge_Gourd_Skin_Chutney_2

It goes well any idli, dosa. Here are few more options from my blog.

Millets Idli

Adai/Lentil Pancakes

Pesarattu/Moong Bean dosa

Tomato Dosa(No fermentation)

Arisi Uoma/Idli Rava Upma

Ingredients:

Ridge Gourd Peel : Skin Peel from one large gourd

Grated coconut : 2 tablespoons

Onion : 1/3 of a large

Tamarind : a very small piece

Green Chili : 2 small

Salt : as needed

Water : as needed

Oil : 1 1/2 teaspoons

Mustard seeds : 1/4 teaspoon

Urad dal : 1/4 teaspoon

Curry leaves : Few

Method:

  • Heat oil in a pan, when hot add mustard seeds, urad dal. When it turn golden color, add curry leaves.
  • Next add the onions. Saute for 2 to 3 mins. Add the ridge gourd skin peel, tamarind and saute for 5 mins.
  • It would get cooked in 5 mins, next stop and add the grated coconut. Mix well, it gets cooked in the heat of the pan and stove.
  • Let it cool.
  • When it cools down, in a mixer, grind the above with salt and water. Use water as per chutney consistency.

Easy thugayal is ready. Serve with idli/dosa.

Share this:

  • Twitter
  • Facebook
  • Tumblr
  • Pinterest
  • Reddit
  • Pocket

Like this:

Like Loading...

White Pumpkin Sambar/Poosanikai Sambar — Bloggivessary Post

26 Thursday Feb 2015

Posted by Malar in CHettinad food, Food, Recipe, Side Dish

≈ 18 Comments

Tags

Chettinad style poosanikai sambar, chettinad style sambar, podi munikina poosanikai sambar, Poosanikai Sambar, pumpkin sambar, sambar recipe, south Indian sambar recipe, white pumpkin sambar

OK, this is going to be a little long post. Feb 26th is the first anniversary for Malar’s Kitchen. I never thought I would blog on for a year. It is already a year and I can’t believe it myself. I started it just like a kid and to document all recipes. To share some Chettinad recipes. I never felt I would be blogging so seriously. Blog world has given me wonderful friends. Though sometimes I did go stressed with the blog post, blogging is always fun, addictive and enjoyable.

I hope and guess have given some healthy recipes, some traditional recipes. Till date there is 182 published post in my blog. Sigh!!! Did I do that? I wonder myself 🙂 I should give credits to my husband who did bare my cooking 😉 yeah sometimes when I try out a recipe and if doesn’t work…he has to manage with it 😛 He is always supportive.  He is as well a blogger, who encouraged me all these days. In case you are interested do check his blog @ Known is a drop, Unknown is an ocean Thanks to all my blog followers, friends who follow in Facebook, friends who have subscribed via email. A big Thanks to everyone who have supported me and let me go on.

I never knew that food photography existed in the first few months while I started blogging. After seeing some wonderful pictures from co bloggers, I thought I should change my way and did few things. Till date I have just taken baby steps to learn.  Hope my pictures look a bit better now.

So for the first anniversary I have chosen my grandma’s recipe, who is everything for me in this world. Instead of a sweet, I have chosen a savory food 🙂 Why not a sweet, read on…

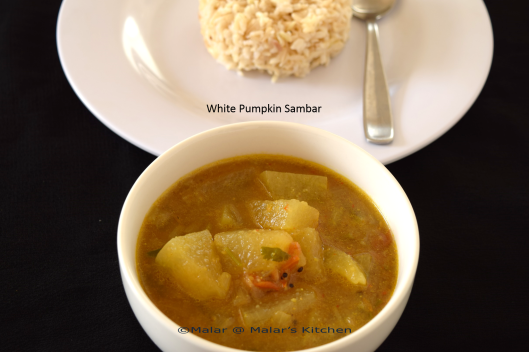
This sambar holds a very special place in my heart, a recipe of my grandma. Whenever she prepares this sambar, I eat lot more 😀 She makes it really spicy and everyone at my home loves it so much. She calls it Podi munukina poosanikai sambar. I have tried it many times and couldn’t get her results 😦 So I called again last week and said amma(I call her amma(mother) rather than grandma as she was the one who grew me up 🙂 ) give me the exact measurements. She always tells me add a bit of this, a bit of that and I miss the correct proportion which spoils the sambar. So this time I got the perfect measurement from her and YAY, I got it perfect 😀 I was so happy and jumped in joy 🙂 I wanted to document it and share with my blog reader, hope everyone would love it as much as I do 🙂

Pumpkin_Sambar Pumpkin_Sambar_1 Pumpkin_Sambar_2

Ingredients:

White Pumpkin/Poosanikai : 1 1/2 cup chopped (skin peeled)

Onion : 1/4 of a large

Tomato : 1/2 of a large

Turmeric Powder : generous pinch

Tamarind : 1 teaspoon

Water : as needed

Salt : as needed

To temper:

Oil : 1 1/2 tablespoon(reduce it if desired)

Mustard seeds : 1/2 teaspoon

Urad dal : 1/2 teaspoon

Curry Leaves : Few

To grind :

Red Chili : 2 large (I have reduced from 4 to 2, if you like it more spicy can increase to 4)

Fennel Seeds/Sombu : 1 1/2 teaspoon

Fenugreek Seeds/Vendhayam: 1/4 teaspoon

Channa Dal/Kadalai Paruppu : 1 tablespoon

Raw Rice/Pachai arisi : 1 1/2 teaspoon

Asafoetida/Hing : 1/8 teaspoon

Method:

  • In a pan, dry roast each ingredient in to grind separately , make sure not to burn and let it cool. When cool, grind it to a coarse powder( I made it  to a fine powder).
  • Heat oil of 1 tablespoon in a medium pan. When hot add onion, saute for 2 mins.
  • Next add the chopped pumpkins, saute for 3 to 4 mins.
  • Next add tomato and saute till it mashes well. Add turmeric powder, salt and mix well.
  • Now add around 1 1/2 cups of water and let it boil for 6 to 7 mins. Close pan with lid.
  • Check if the pumpkin is 60 to 70% cooked. Now add the ground powder. Mix well.
  • Sambar would start getting thicker. Add 1/2 cup of water more and mix.
  • You can adjust water , so that it has the consistency of sambar. Make sure it is not too thick or not too watery.
  • Check for salt and adjust it as well.
  • Boil for another 10 mins. Now add tamarind juice and mix.
  • Boil for 5 mins. Finally check if the pumpkins are fully cooked with flavors.
  • Now heat 1/2 teaspoon oil in a small pan, add mustard seeds, urad dal, hing. When they crackle, add curry leaves. When it splutters add it to the sambar.
  • Garnish with cilantro leaves and serve with rice.

Once again heart felt Thanks to all followers and supporters.

Share this:

  • Twitter
  • Facebook
  • Tumblr
  • Pinterest
  • Reddit
  • Pocket

Like this:

Like Loading...

Coconut Chutney

24 Tuesday Feb 2015

Posted by Malar in Food, Indian Breakfast, Recipe, Side Dish

≈ 17 Comments

Tags

Coconut Chutney, easy Indian Chutney recipes, how to make coconut chutney, Indian Breakfast recipe, Indian Chutney recipes, South Indian Coconut Chutney

Coconut chutney is everyone’s favorite I guess, I am no exception 🙂 Just realized that this easy chutney is not in my blog 😉 This post is for few of my friends, who always asks me for this recipe.

coconut_chutney coconut_chutney_1

Ingredients:

Grated Coconut : 1/4 cup

Roasted Gram/Pottukadalai : 2 tablespoons

Green Chili : 1

Ginger : 1 very small piece (optional)

Salt : as required

Water : as required

Oil : 1/4 teaspoon

Mustard Seeds: 1/4 teaspoon

Urad Dal : 1/4 teaspoon

Red Chili : 1 (optional)

Asafoetida : 1/8 teaspoon

Curry Leaves : Few

Method:

  • Grind coconut, roasted gram, green chili, ginger piece to a fine paste.
  • Add enough water, salt. Mix well.
  • Heat oil in a small pan, add mustard seeds, urad dal, red chili, asafoetida.
  • When it turns golden brown, add curry leaves. When it splutters, mix this with the chutney.

Do not boil chutney, it spoils the taste. Just mix the tadka with the chutney.

Ginger is totally optional, it gives a very nice taste.

Check out some of my other breakfast recipes in this link.

Share this:

  • Twitter
  • Facebook
  • Tumblr
  • Pinterest
  • Reddit
  • Pocket

Like this:

Like Loading...

Spinach Raita/Palak Raita

22 Sunday Feb 2015

Posted by Malar in Food, Recipe, Side Dish

≈ 11 Comments

Tags

easy raita recipes, Healthy Spinach, Indian Spinach recipes, raita recipes, Spinach raita, Spinach Yogurt dip

Spinach Raita is something very tasty and easy to prepare. Spinach health benefits need not be given to explain the importance, as we all know about it. I have always heard that weekends are usually special at everyone’s place, but at my home I make very simple. It is usually Veggie Quinoa either on Saturday or Sunday. My hubby would want just yogurt for this as an accompaniment. I thought why not make it healthy with spinach and here is spinach raita 🙂

Spinach_Raita Spinach_Raita_1

Ingredients:

Spinach : 1 cup packed

Yogurt/Curd : 4 tablespoons

Salt : 1/4 teaspoon

Cumin Powder : 1/4 teaspoon

Red Chili Powder : 1/4 teaspoon

Water : 2 tablespoons

Method:

  • Clean spinach. In a pan, add the washed spinach and water of around 2 tablespoons and heat in high for 5 mins.
  • Spinach would leave out water , let it cool.
  • Once cool, take out spinach and chop to small pieces.
  • Drain the water and set aside(do not throw away).
  • Now in a mixing bowl, add yogurt, salt, cumin powder, red chili powder and the spinach cooked water.
  • With a whisk, beat well to a fine paste.
  • Next add the chopped spinach and again mix with the whisk.

Spinach raita is ready 🙂

Goes great with any pulao, biriyani. Few recipes given below

Veggie Quinoa

Mushroom Biriyani

Capsicum Masala Rice

Celery Rice

Share this:

  • Twitter
  • Facebook
  • Tumblr
  • Pinterest
  • Reddit
  • Pocket

Like this:

Like Loading...
← Older posts
Follow Malar's Kitchen on WordPress.com

Enter your email address to follow this blog and receive notifications of new posts by email.

Facebook Page for Malar’s Kitchen

Facebook Page for Malar’s Kitchen

Follow me on Twitter @malarskitchen

My Tweets

All Cooking Sites

All Cooking Sites

Indi Blogger

IndiBlogger - The Largest Indian Blogger Community

myTaste.in

myTaste.in

SheBlog

Smart Indian Women

Very Good Recipes

Very Good Recipes
You can find my recipes on Very Good Recipes

Taste Query

Tasty Query - recipes search engine

Snapshots

This slideshow requires JavaScript.

Categories

  • Awards
  • Baking
  • Beverages
  • Biriyani
  • CHettinad food
  • Food
  • Gravy
  • Guest Post
  • Health Tips
  • Indian Breakfast
  • Paratha/Roti
  • Recipe
  • Rice
  • Side Dish
  • Snack
  • Sweets/Desserts
  • Tips
  • Uncategorized

Archives

  • January 2018 (1)
  • December 2017 (1)
  • April 2016 (1)
  • December 2015 (3)
  • November 2015 (4)
  • October 2015 (3)
  • May 2015 (1)
  • April 2015 (10)
  • March 2015 (9)
  • February 2015 (12)
  • January 2015 (11)
  • December 2014 (2)
  • November 2014 (3)
  • October 2014 (12)
  • September 2014 (20)
  • August 2014 (25)
  • July 2014 (31)
  • June 2014 (24)
  • May 2014 (20)
  • April 2014 (8)
  • March 2014 (11)
  • February 2014 (5)
March 2023
M T W T F S S
 12345
6789101112
13141516171819
20212223242526
2728293031  
« Jan    

Foodie Blogger

The Foodie Blog Roll

Blog at WordPress.com.

Privacy & Cookies: This site uses cookies. By continuing to use this website, you agree to their use.
To find out more, including how to control cookies, see here: Cookie Policy
  • Follow Following
    • Malar's Kitchen
    • Join 380 other followers
    • Already have a WordPress.com account? Log in now.
    • Malar's Kitchen
    • Customize
    • Follow Following
    • Sign up
    • Log in
    • Report this content
    • View site in Reader
    • Manage subscriptions
    • Collapse this bar
 

Loading Comments...
 

    %d bloggers like this: