• About Me
  • Awards
  • Breakfast
  • Recipes

Malar's Kitchen

~ My kitchen Experiments

Category Archives: Snack

Sweet Diamond Cuts/Shakkarpaara

17 Tuesday Nov 2015

Posted by Malar in Food, Recipe, Snack, Sweets/Desserts

≈ 20 Comments

Tags

Baked Diamond Cuts, Shakkarpaara, Shakkarpaara with Gulab Jamun sugar syrup, Snack With Sugar Syrup, Sweet Diamond Cuts, what to do with excess suagr syrup, Whole Wheat Diamond cuts

Hope you all had a wonderful Diwali. I just made some millet poha ladoo , murukku, gulab jamun. On Diwali day, managed to make some Masala Cheeyam as well.

For gulab jamun I used the instant pack. I had some sugar syrup left out . Its was flavorsome as I had added some saffron, cardamom, vanilla extract. Usually everyone adds rose essence, I didn’t have it, so I used vanilla extract. I somehow didn’t want to throw that syrup. Decided to make sweet diamond cuts with it. It came out awesome. A great tea time snack. I have made it with whole wheat flour. Again traditionally it is made with all purpose flour/maida and semolina/sooji.

I have not given any measurement as I didn’t use any. You can play around with the sweetness and the amount of flour. Also I have not used oil while making dough, as the gulab jamun would leave out oil in the syrup.

Shakkarpaara_1

Shakkarpaara

Ingredients:

Whole Wheat Flour/Aata

Sugar Syrup

Oil : to deep fry

Salt : a pinch

Water : in case needed to make dough

Method:

  • Combine flour, sugar syrup, salt and mix well.
  • Form a dough if needed add some water and make a firm dough.
  • It should not be loose and should be a thick one.
  • Set aside for half an hour.
  • Roll out with rolling pin and cut in to small diamond shaped pieces.
  • While rolling out as we are deep frying, make it medium sized not too thick nor thin.
  • Heat oil for deep frying.
  • When hot, slowly drop pieces in and let it fry. Have the heat in low medium.
  • Once done, remove and drain excess oil in a paper towel.
  • Enjoy with a hot cup of chai or coffee.

For baked and savory version, here is the link Baked Wheat Crackers.

Advertisement

Share this:

  • Twitter
  • Facebook
  • Tumblr
  • Pinterest
  • Reddit
  • Pocket

Like this:

Like Loading...

Oats Qunioa Balls

15 Wednesday Apr 2015

Posted by Malar in Food, Guest Post, Health Tips, Recipe, Snack, Sweets/Desserts

≈ 6 Comments

Tags

Oats cranberry balls, Oats Quinoa Balls, Oats recipes, Quinoa, Quinoa Balls, Quinoa Indian style recipe

Most of my blog readers won’t need any introduction to Vidya @ Traditionally Modern Food , she is one good friend of mine and has always been very supportive from my initial days of blogging. We share a great bond together. I have given a guest post to her on Oats Quinoa Balls, hope you all will like it. Hop on to her blog to find my recipe 🙂

Link to her blog and recipe click here

Blog link: https://traditionallymodernfood.wordpress.com/

FB link: https://www.facebook.com/pages/Traditionally-Modern-Food/762621750435010?ref=hl&ref_type=bookmark

Pinterest link: http://www.pinterest.com/tradmodfood/traditionally-modern-food/

Twitter: https://twitter.com/tradmodfood

Oats_Quinoa_Balls Oats_Quinoa_Balls_1 Oats_Quinoa_Balls_2

You will soon find a post from her on my blog 🙂

Share this:

  • Twitter
  • Facebook
  • Tumblr
  • Pinterest
  • Reddit
  • Pocket

Like this:

Like Loading...

Ghee Rice and Dal Tadka

12 Sunday Apr 2015

Posted by Malar in Food, Recipe, Rice, Snack

≈ 12 Comments

Tags

Dal Tadka, Dal tadka rice variety, easy Indian lunch recipe, easy variety rice, Ghee rice, Jeera rice, Rice Variety, South Indian rice, variety rice

Ghee rice and dal tadka, what a classic combination isn’t it? As I have mentioned earlier in my post, I never make anything lavish during weekend. It is always very simple and quick recipes during the weekend for us. As this happens to be the most quality time, me and my hubby spend together 🙂 Weekdays are very busy and he is occupied with his offshore calls when he is at home. So my weekends are always simple and fun 🙂

Again since we moved to brown rice for our day to day use, and Saturdays are specially designated for quinoa at my home, only Sundays we eat white rice. So I make some mixed rice to make it quick. I thought I don’t have this simple combo in my blog, hence this post 🙂

For more rice varieties from my blog, please check here

Ghee_Rice_Dal_Tadka Ghee_Rice_Dal_Tadka_3 Ghee_Rice_Dal_Tadka_2 Ghee_Rice_Dal_Tadka_1

Ghee Rice:

Ingredients:

Basmathi Rice : 1 cup

Water : 2 cups

Bay Leaf :1

Cloves : 2

Cardamon Piece : 1

Cinnamon Stick : 1 small

Ghee : 2 to 3 tablespoons

Jeera/Cumin Seeds : 1 1/2 teaspoon

Cashews : Few

Salt : to taste

Method:

  • Wash rice, add cinnamon stick, cardamom, bay leaf, cloves and water.
  • Cook with 2 cups water either in pressure cooker or electric cooker or in open method.
  • Let it cool.
  • Heat ghee in a pan.
  • When hot add cashews, jeera. When it turns golden brown, stop.
  • Add it to the cooked rice, mix with salt and combine well.

Jeera rice is ready 🙂

Dal Tadka:

Ingredients:

Moong Dal : 3/4 cup

Onion : 1/4 of a large

Tomato : 1 (I used roma tomato)

Green Chili : 1

Water : 2 cups

Turmeric Powder : a generous pinch

Garlic : 3 pods

Oil : 1 teaspoon

Cumin Seeds/Jeera : 1/4 teaspoon

Asafoetida : a generous pinch

Red Chili : 1

Curry Leaves : Few

Salt : to taste

Method:

  • Clean and wash moong dal. Chop onions, green chili, garlic and tomato.
  • Pressure cook all these together with turmeric powder and water for 3 to 4 whistles.
  • Once done, stop and let the pressure ease.
  • When pressure eases, open the cooker, add salt and mash the dal well.
  • Heat a pan with oil. When hot add cumin seeds, asafoetida and red chili. When it crackles, add curry leaves and finally add it to the cooked dal.

Dal tadka is done.

This goes great with any variety rice, chappathi or paratta.

Share this:

  • Twitter
  • Facebook
  • Tumblr
  • Pinterest
  • Reddit
  • Pocket

Like this:

Like Loading...

Ragi Murukku/Chakkli (Baked and Deep fried)

16 Monday Mar 2015

Posted by Malar in Baking, Food, Recipe, Snack

≈ 35 Comments

Tags

Baked murukku recipe, Baked Ragi chakkli, Baked Ragi Murukku, Finger millet recipes, Ragi Chakkli, Ragi Murukku

My love towards Ragi continues. This was on my list of to do from a very long time. Use of oil totally scares me out. My hubby will never want me to use sunflower oil. But for Indian cooking specially deep frying, this is the best suited oil. He kept ruling out the option. One fine day when I went for shopping alone, I got one bottle of sunflower oil. He found it the next day in kitchen and started questioning me 😀 In between I gotta enjoy some pleasures isn’t it 😉

So here is the both baked and deep fried version. Warning, baked version doesn’t taste exactly the same way as deep fried version. It tends to break soon as well. But yes for health concerns they are the best. But I liked the baked version equally good as deep fried. Do give it a try 🙂

Ragi_Murkku Ragi_Murkku_1 Ragi_Murkku_Baked

Ingredients:

Ragi Flour : 1 Cup

Rice Flour : 1/2 cup

Garbanzo Flour(Besan) : 1/2 cup ( you can use Roasted gram flour/pottukadalai flour instead)

Butter : 2 tablespoons

Cumin Seeds : 1 teaspoon

Red Chili Powder : 1 teaspoon ( I felt it was less, you can increase the quantity)

Asafoetida/Hing : 1/2 teaspoon

Salt : 1/2 teaspoon

Water : as needed

Oil : as needed to deep fry

Method:

  • Mix all the flours, cumin seeds, red chili powder, asafoetida, salt, butter.
  • Add water and form a nice dough, Dough should not be thick or watery. Make sure it is moist.
  • Keep it covered for 10 to 15 mins.

For deep fried version:

  • Heat oil in a pan.
  • Take the chakkli maker/Murukku katai, fill in with dough. Start pressing in round shape.
  • You can press it in a big spoon(karandi).
  • When oil is hot, slowly slide in the spoon where the chakkli is pressed.
  • It would start cooking. Make sure the oil in in medium hot. It should not be too hot or less.
  • Turn sides after 2 to 3 mins. When it is done you will find that the oil sizzling sound stops. At that time take it out and place it in a paper towel to drain the excess oil.
  • Similar way place cook other chakkli/murukku.

For baked version:

  • Preheat oven to 350F.
  • Get a baking sheet ready, place a parchment paper and spray oil over it.
  • Now start pressing murkku/chakkli from the maker. Give enough space between each of them.
  • Bake it for 12 mins first side. Take out flip sides and bake for 15 mins.
  • Then take out and cool.

Enjoy the healthy teatime snack 🙂

Share this:

  • Twitter
  • Facebook
  • Tumblr
  • Pinterest
  • Reddit
  • Pocket

Like this:

Like Loading...

Dilkush/Coconut Raisin stuffed bun

02 Monday Mar 2015

Posted by Malar in Baking, Food, Recipe, Snack

≈ 19 Comments

Tags

Coconut Bun, Dilkush, how to make coconut bun, how to make dilkush, Indian style coconut bun, Iyengar Bakery style Dilkush

Coconut bun is one of my childhood favorite. I used to have at least one piece everyday from bakery 😉 I somehow stopped it in between and found it back in my Bangalore days at Iyengar bakery. Widely called as Dilkush, made with coconut and tutty fruti. Aww how much I used to love them. Now that in US , I have the oven to bake it..why not give it a try. Yep it turned out super awesome… It is a bit long process, but worth every second of it 🙂 I have just added coconut , nuts and raisins. Dilkush is made with tuti fruti. I did not have them in stock, so haven’t added them. Here is the recipe…

Dilkush_1 Dilkush_2Dilkush

Ingredients:

Whole Wheat Flour : 1 cup + 2 tablespoons + extra to dust

All Purpose Flour : 1 cup

Sugar : 3 tablespoons

Salt : 1/4 teaspoon

Water : 1/4 cup

Milk : 1/2 cup

Butter : 1 tablespoon

Yeast : 1 1/4 teaspoon

Filling:

Coconut : 3/4 cup

Cashew+almonds+ raisins  : 1/2 cup ( In case tutti fruti is used reduce cashew and almonds, avoid sugar)

Cardamom Powder : a pinch

Jaggery/Sugar : 1 tablespoon( I used jaggery)

Ghee/Oil : 1 tablespoon

Method:

  • Take lukewarm water, add 1 teaspoon sugar. Mix yeast and set aside for 10 mins.
  • Yeast would froth in 10 mins.
  • Warm up milk before kneading dough.
  • Mix whole wheat flour, all purpose flour, salt, sugar. Sieve it in a medium bowl.
  • Now mix the yeast and milk with the sieved flour.
  • Now knead the dough for 10 mins.
  • In a medium bowl, oil the base and sides, keep the dough and oil the top portion.
  • Cover with a wet towel and place it in a warm place. For me fridge top is the best place to get this done.
  • Leave it for an hour.
  • Now get the filling ready. Heat a pan with either oil or ghee. When hot add chopped cashews, almonds. When it turns slight golden color, add raisins. Let it pop.
  • Now stop heat and add grated coconut and saute in the remaining heat.
  • In case you are adding tutti fruti add it as well.
  • Add jaggery or sugar mix well. Filling is ready.
  • Place a parchment paper over the baking tray, spray with cooking oil and get it ready.
  • After an hour, the dough would double in size. Now punch out the dough. Knead for another 2 to 3 mins.
  • Cut the dough to 2 pieces. Take one piece and make a flat base just like pizza base.
  • Base would be thick enough around a size of 8 inches.
  • Now on top, place the filling. Leave 1/2 cm on the edges. Place this base in the baking tray.
  • With the other portion of dough, flatten similar to the base.
  • Cover it over the base with filling. Pinch the edges. Take a fork and club the edges of both base and top.
  • Cover this as well and set it for 30 mins in a warm place.
  • Have 1 tablespoon of milk and a bit of sugar mixed and ready.
  • Preheat oven to 400F. Before baking, just brush this milk and sugar mix over the top.
  • Bake for 20 to 25 mins. Mine took 25 mins.
  • Cool it, cut and serve 🙂

You can totally use All purpose flour/maida instead of whole wheat flour.

Tutti frutti can be used with only coconut, no need of raisins and cashews.


Share this:

  • Twitter
  • Facebook
  • Tumblr
  • Pinterest
  • Reddit
  • Pocket

Like this:

Like Loading...

Oats Kozhukattai

23 Monday Feb 2015

Posted by Malar in Food, Recipe, Snack

≈ 19 Comments

Tags

Kozhukattai, Oats Indian Breakfast, Oats Indian recipes, Oats Indian style recipe, Oats Kozhukattai, Pidi Kozhukattai, Pidi Kozhukattai recipe

I always prepare rice kozhukattai and wanted to make it with Oats. Many of my friends tells me that incorporating oats in everday routine is difficult for them. As most of us Indians like savory food for breakfast or snack. Here in US , Oats is usually taken in a sweet way. We adapting it, is a bit difficult….at least for South Indians I guess 😉 Do give this recipe a try. This will surely be treat for taste buds.

Oats_Kozhukattai_1

Oats_Kozhukattai Oats_Kozhukattai_2

Ingredients:

Oats : 1 cup ( any kind, rolled oats or instant oats)

Water : 3/4 cup

Salt : 1/4 teaspoon

Oil : 1 teaspoon

Mustard Seeds : 1/4 teaspoon

Urad dal : 1/4 teaspoon

Curry Leaves : Few

Onion : 1/4 of a large

Green Chili : 1 small

Method:

  • Dry roast Oats until nice aroma rises(It will take around 3 to 4 mins). Let it cool.
  • Once cool, grind it to either fine powder or coarse powder. I made coarse powder.
  • Heat oil in a pan. When hot add mustard seeds, urad dal. When it turns slight golden color, add curry leaves. (Chop curry leaves into pieces and put, so that it can merge well)
  • When curry leaves splutter, add onion, green chili. Saute for 2 mins.
  • Next add water and salt. Let it boil well.
  • When it boils add the oats powder and mix. It will get cooked fast.
  • Oats will come together soon. When it turns sticky enough, switch off and let it cool.
  • Meanwhile grease idli plates and get idli pot also ready.
  • When the oats is cooled down, grease your palm with oil.
  • Make small balls and steam it for 10 mins in high.
  • Serve with any spicy chutney, as oats is a little bland in taste.

This can be served as both breakfast and snack. I served it with spicy coconut chutney.

Few other Oats recipes for breakfast from my earlier post

Oats Upma

Oats Idli

Oats Uthappam


Share this:

  • Twitter
  • Facebook
  • Tumblr
  • Pinterest
  • Reddit
  • Pocket

Like this:

Like Loading...

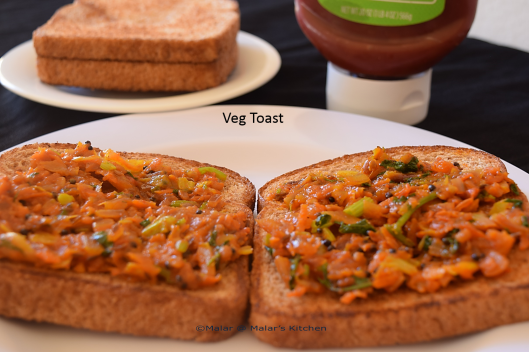
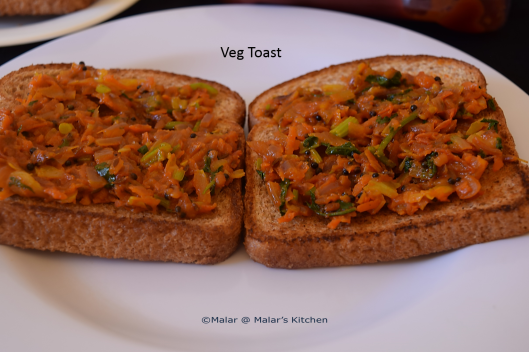
Veg Toast — Iyengar Bakery style

19 Thursday Feb 2015

Posted by Malar in Food, Indian Breakfast, Recipe, Snack

≈ 20 Comments

Tags

Bangalore style vegetable sandwich, easy Indian sandwich, Iyengar Bakery style sandwich, Iyengar Bakery style veg toast, veg sandwich, veg sandwich Indian style, Veg toast

If you visit Bangalore, you must try this veg toast for sure. In case you are from Bangalore or have an idea about this toast, I am sure I need not explain the taste 😉 Iyengar Bakery is famous bakery chain in Bangalore and all their products are absolutely tasty. This toast has a special taste which will make you fall in love for these toasts. Though I have made onion tomato curry for sandwich, I somehow love this style of sandwich. Then googled and found the simple trick to prepare this and the secret ingredient that gives it a great taste. You must try it at home, very simple and easy.

Veg_Toast Veg_Toast_1 Veg_Toast_2 Veg_Toast_3

Ingredients:

Onion : 1/2 of a large

Tomato : 1 medium

Carrot : 1 medium grated

Cabbage : 5 to 6 leaves(handful chopped)

Capsicum :1 small ( I haven’t used)

Red Chili Powder : 1/4 teaspoon

Turmeric Powder : a pinch

Chat Masala : 1/4 teaspoon

Tomato Ketchup : 2 tablespoons

Oil : 1.5 teaspoon

Mustard Seeds : 1/4 teaspoon

Urad Dal : 1/4 teaspoon

Cumin Seeds : 1/4 teaspoon

Salt : as needed

Cilantro Leaves : to garnish

Bread Slices : 4

Butter : as needed to toast

Method:

  • Chop onion, tomato, cabbage to small pieces and grate carrot.
  • Heat oil in a pan, add mustard seeds, urad dal, cumin seeds.
  • When it crackles, add onions and saute till translucent.
  • Next add tomato and saute till soft.
  • Now add grated carrot, cabbage, capsicum.
  • Cook for 3 mins. Next add red chili powder, chat masala, salt, tomato ketchup and mix well.
  • Ensure all vegetables are well cooked. It takes around 5 to 6 mins. Taste and adjust in case anything needed.
  • Heat a tawa and toast bread with butter.
  • Now place this veggies masala in between and serve.

Easy and tasty veg toast is ready 🙂

Share this:

  • Twitter
  • Facebook
  • Tumblr
  • Pinterest
  • Reddit
  • Pocket

Like this:

Like Loading...

Ragi Kaara Biscuits (savory)

30 Friday Jan 2015

Posted by Malar in Baking, Food, Recipe, Snack

≈ 26 Comments

Tags

cracker recipes, easy cracker recipes, Finger Millet buscuits, Finger Millet crackers, Finger millet recipes, healthy cracker recipes, Ragi Biscuits, Ragi crackers, Ragi Flour recipes, Ragi Kaara buscuits, Ragi Khara buscuits, Ragi recipes, Ragi salt biscuits, Ragi savory biscuits, savory biscuits

It has been really long since I used my oven to bake something. Guess it is almost 3 months now. Finally few days back I tried to make a beetroot cake, guess what it turned out to be the worst I had ever tried 😛 We threw the complete cake in trash 😦

Coming to this post, yesterday I tried these biscuits and turned out super awesome.These Ragi biscuits are very famous in Bangalore. My usual snack during my spinster Bangalore days used to be these. One pack would cost around 20 to 30 rupees. My friends used to make fun of me on why am I having these biscuits. But I love these biscuits so much, specially the savory biscuits. I wanted to try and turned out well. My hubby will pick up only one piece of any snack that I make, at the max 2. This time he had 3 at a time and he said everything was perfect and Malar is very happy now 😀 Hope everyone likes it too 🙂

Ragi_biscuits_2


Ragi_biscuits_1 Ragi_biscuits


Ingredients:

Ragi Flour/Finger Millet Flour : 1 1/2 cups

Whole Wheat Flour : 1/2 cup

Oil : 1/4 cup +1 tablespoon

Salt : 1 1/2 teaspoon

Sugar : 1 teaspoon

Red Chili Powder : 2 teaspoon ( can increase to 3 teaspoons)

Yogurt/Curd : 4 tablespoons

Water : 1/4 to 1/2 cup(adjust accordingly)

Method:

  • Dry roast ragi flour for 5 mins. (3 mins in medium and 2 mins in low medium)
  • Make sure not to burn the flour, keep stirring. Leave it to cool after roasting.
  • Next in a medium bowl, sieve the roasted ragi flour. Add wheat flour, red chili powder, salt and sugar. Mix well.
  • Now add yogurt, oil to the flour and mix. Then slowly add water and make a soft dough.
  • Let it rest for 10 mins.
  • Meantime preheat oven to 400F and line the baking tray with parchment paper. Spray with cooking oil.
  • Now in a surface sprinkle some flour. Divide the dough to 3 parts. Roll the dough on the surface and take a cookie cutter ( I used just a small bowl to make round shape) and cut the dough to desired shape.
  • Place on the baking tray. I baked it for 23 mins. ( First I tried with 18 mins, didn’t feel the crunchiness, so added 5 more mins)

This is a great tea time snack. Serve with a cup of tea or coffee 🙂

Notes:

I could get around 20 pieces. It depends on the size and shape which you are preparing.

Oil can be replaced with butter. Red chili powder can be replaced with green chili paste.

If desired instead of yogurt, egg can also be added.

For sweet version add sugar more with just a pinch of salt and cut down chili powder.

If you want a gluten free, cut wheat flour and add ragi flour instead.


Share this:

  • Twitter
  • Facebook
  • Tumblr
  • Pinterest
  • Reddit
  • Pocket

Like this:

Like Loading...

Green Chutney(Dip) with Avocado

29 Thursday Jan 2015

Posted by Malar in Food, Indian Breakfast, Recipe, Side Dish, Snack

≈ 8 Comments

Tags

Avocado dip, Green CHutney dip, Green Chutney recipe, Green Chutney spread, Green Chutney with avocado, Mint Cilantro chutney, Sandwich chutney, Sandwich chutney recipe, sandwich spread

Who doesn’t love green chutney? I hope I am not biased 😉 , but as far as I have seen many of us love this chutney. It goes great as a sandwich spread, dip for chaat, samosa, pakora. I tried it with an addition of avocado. It came out really well.

Green Chutney_avocado Green_Chutney_Avocado Green_Chutney_avocado_1

Ingredients:

Cilantro Leaves : 1 cup (packed)

Mint Leaves : 1/2 cup(packed)

Ginger : 1 inch piece

Green Chili : 2

Salt : as required

Cumin Powder/Jeera Powder : 1 teaspoon

Lemon juice : 1 tablespoon

Avocado : 1 small

Method:

Clean cilantro leaves, mint leaves. Peel ginger skin. Cut the green chili. Scoop avocado.

In a blender, add all the ingredients and make it a fine paste.

This can be stored in refrigerator for 3 days. Lemon juice helps retain the color.

I served as a spread for bread toast. This is a versatile recipe which can be used as a side dish for any Indian items.

Share this:

  • Twitter
  • Facebook
  • Tumblr
  • Pinterest
  • Reddit
  • Pocket

Like this:

Like Loading...

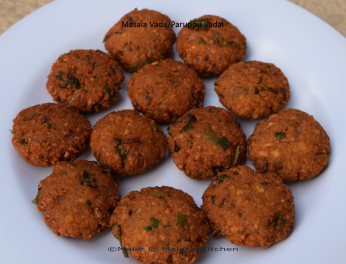
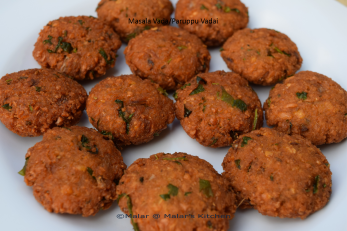
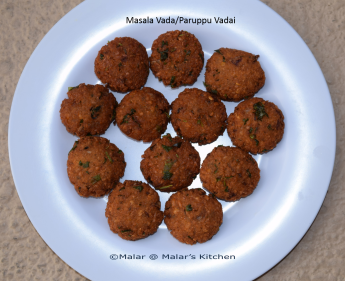
Masala Vada/Paruppu Vadai

09 Friday Jan 2015

Posted by Malar in Food, Recipe, Snack

≈ 23 Comments

Tags

easy vada recipe, how to make masala vada, Indian Style tea time snack, Masala Vada, Paruppu Vadai, vada recipe

I always feel this is the easiest recipe of vada variety. It would never go wrong 😛 Any tea shops in Tamil Nadu, you can find masala vada at anytime. A great tea time snack. I can eat this even with yogurt rice 🙂 Lots of variation can be done with this. We can add spinach, veggies etc. This is the basic vada recipe.

Masala_Vada_1 Masala_Vada_2Masala_Vada

Ingredients:

Channa Dal : 1 1/2 cup

Red Chili : 3

Fennel Seeds : 1 teaspoon

Onion : 1/2 of a large

Salt : 1 teaspoon

Curry Leaves : Few

Cilantro Leaves : Few

Ginger : 1 inch piece

Garlic : 4 to 5 pods

Asafoetida : 1 teaspoon

Oil : for deep frying

Method:

  • Soak channa dal in water for minimum 4 hours or overnight.
  • Then drain water and grind the dal with garlic, ginger, fennel seeds and red chili. Make it a coarse paste. Add very minimal water while grinding.
  • When you are ready to fry the vada’s, add salt, asafoetida, chopped cilantro leaves, chopped curry leaves with the batter and mix well.
  • Heat oil in a heavy bottomed pan. Make sure the oil is heated in medium flame.
  • To check if oil is ready, put a small drop of batter and it should come up immediately.
  • Now take a small ball of batter, flatten it between palms ,slide it in to the oil and deep fry it on both the sides.
  • When you slide the vada, make sure the first side cooks for at least 2 mins, then turn over to the next side. There are chances that the vada might break, if turned without cooking properly.
  • Drain in a paper towel and serve with a hot cup of chai 🙂


Share this:

  • Twitter
  • Facebook
  • Tumblr
  • Pinterest
  • Reddit
  • Pocket

Like this:

Like Loading...
← Older posts
Follow Malar's Kitchen on WordPress.com

Enter your email address to follow this blog and receive notifications of new posts by email.

Facebook Page for Malar’s Kitchen

Facebook Page for Malar’s Kitchen

Follow me on Twitter @malarskitchen

My Tweets

All Cooking Sites

All Cooking Sites

Indi Blogger

IndiBlogger - The Largest Indian Blogger Community

myTaste.in

myTaste.in

SheBlog

Smart Indian Women

Very Good Recipes

Very Good Recipes
You can find my recipes on Very Good Recipes

Taste Query

Tasty Query - recipes search engine

Snapshots

This slideshow requires JavaScript.

Categories

  • Awards
  • Baking
  • Beverages
  • Biriyani
  • CHettinad food
  • Food
  • Gravy
  • Guest Post
  • Health Tips
  • Indian Breakfast
  • Paratha/Roti
  • Recipe
  • Rice
  • Side Dish
  • Snack
  • Sweets/Desserts
  • Tips
  • Uncategorized

Archives

  • January 2018 (1)
  • December 2017 (1)
  • April 2016 (1)
  • December 2015 (3)
  • November 2015 (4)
  • October 2015 (3)
  • May 2015 (1)
  • April 2015 (10)
  • March 2015 (9)
  • February 2015 (12)
  • January 2015 (11)
  • December 2014 (2)
  • November 2014 (3)
  • October 2014 (12)
  • September 2014 (20)
  • August 2014 (25)
  • July 2014 (31)
  • June 2014 (24)
  • May 2014 (20)
  • April 2014 (8)
  • March 2014 (11)
  • February 2014 (5)
February 2023
M T W T F S S
 12345
6789101112
13141516171819
20212223242526
2728  
« Jan    

Foodie Blogger

The Foodie Blog Roll

Blog at WordPress.com.

Privacy & Cookies: This site uses cookies. By continuing to use this website, you agree to their use.
To find out more, including how to control cookies, see here: Cookie Policy
  • Follow Following
    • Malar's Kitchen
    • Join 380 other followers
    • Already have a WordPress.com account? Log in now.
    • Malar's Kitchen
    • Customize
    • Follow Following
    • Sign up
    • Log in
    • Report this content
    • View site in Reader
    • Manage subscriptions
    • Collapse this bar
 

Loading Comments...
 

    %d bloggers like this: