• About Me
  • Awards
  • Breakfast
  • Recipes

Malar's Kitchen

~ My kitchen Experiments

Category Archives: Food

Vegetable Biriyani (Instant Pot method)

11 Monday Dec 2017

Posted by Malar in Biriyani, Food, Recipe, Rice

≈ Leave a comment

Tags

Indian Style Veg Biriyani in Instant Pot, Indian Style Vegetable Biriyani, Instant Pot biriyani, Veg Biriyani, Vegetable Biriyani, Vegetable Biriyani in Instant Pot

Hello everyone,

It has been more than a year that I wrote something in this blog, thought I would post something for 2017. Life has been really busy and have not been able to keep up. A lot of changes have happened over this year. I have moved to instant pot from normal Indian pressure cooker and have been loving it so much that I totally forgot normal pressure cooker and started using only instant pot. My terms of eating healthy have changed too. I learnt that I have been taking more of carbs than protein. Protein is something very important for us. And carbs in moderation is needed to our body. White rice is not completely bad, in case it is paired up with proper protein. Be it white rice or brown rice, the carb level is same, except brown has more fiber, same goes with wheat flour or normal flour. One major reason is this learning I had about food, I am trying to change myself to a proper diet. So this is one post, I am writing here. I may not continue more, if time permits, I promise to do at least one post a month.

VB2VB3

Simple biriyani, the recipe goes below.

Ingredients:

Rice – 2 cups

Water – 4 cups

Veggies of your choice, I added

  • Carrot -1
  • Potato – medium sized 1
  • Green Beans – 10 to 15
  • Peas – handful
  • Mushroom – 5(button mushrooms)
  • Cauliflower — few florets as needed
  • Edamame – handful
  • Onion — 1 large
  • Tomato – half (Roma or cluster)

Cilantro Leaves — handful

Mint Leaves – handful

Red chili powder — 1 tspn

Corriander powder — 1 tablespoon

Biriyani Masala — 1 tablespoon

To season:

  • Cinnamon Stick — 1 large
  • Bay Leaves — Few
  • Anise Star –1
  • Cardamom — 2 pods
  • Cloves — 3
  • Black Pepper — few
  • Fennel Seeds — few

Ghee – 3 tablespoons ( you can use oil instead)

Ginger Garlic paste – 1 tablespoon

Salt — 4 teaspoons

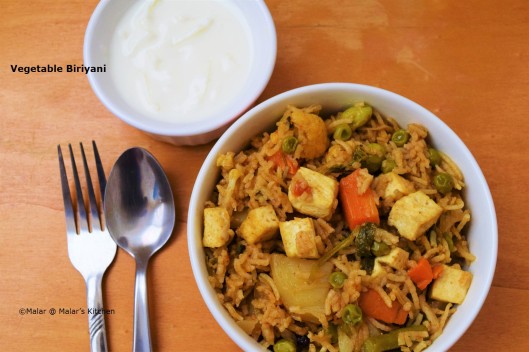
I have added Tofu finally by sauteing in a bit of oil with little salt. ( You can very much use paneer)

Method:

  1. Have instant pot in saute mode, add ghee or oil.
  2. Meanwhile soak rice in water.
  3. Once hot add items in to season.
  4. Next add onions and saute for 2 minutes, add ginger garlic paste.
  5. Next add potato saute for a minute.
  6. Next add carrot and green beans saute for 2 minutes.
  7. Add edamame, peas and saute for another 2 minutes.
  8. Next add cilantro leaves, mint leaves, tomato, give it a good mix.
  9. Add chili powder, corriander powder, biriyani masala nad give a good stir.
  10. Next finally add cauliflower and drained rice. Give a good mix. Stop saute mode in IP.
  11. Add water and salt. Close IP and put it in sealing. You can do rice mode or Manual 5 minutes. Let it NPR in manual mode. With Rice mode I would wait for 5 minutes after it is done and NPR.

Finally mix the sauteed Tofu or Paneer which gives more protein.

Enjoy biriyani with raita.

Advertisement

Share this:

  • Twitter
  • Facebook
  • Tumblr
  • Pinterest
  • Reddit
  • Pocket

Like this:

Like Loading...

Vazhaipoo thugayal/Banana Flower petal chutney

13 Wednesday Apr 2016

Posted by Malar in Food, Gravy, Health Tips, Recipe, Side Dish

≈ 9 Comments

Tags

Banana Flower Chutney, banana flower petal chutney, chutney recipes, Vazhai poo thugayal, Vazhaipoo chutney, vazhaipoo thokku

Hello friends,

Been really long, absolutely no time to check my blog. Have been thinking of posting, ain’t got time to write down a post. Have some pictures taken and been there in the memory card. Little one is growing fast and I am going around her where ever she crawls. This gets the mommy tired 🙂 Anyways lets get to this recipe. This is a recipe from my dear friend PM’s mom. When she told me that is she going to make this thugayal, I got fascinated and loved the recipe. I wanted to try immediately and absolutely loved the taste. This recipe is one of the treasured recipes from her mom.

PM this is dedicated to your mom 🙂

Vazhaipoo_thugayal Vazhaipoo_thugayal_1 Vazhaipoo_thugayal_ing Vazhaipoo_thugayal_ing_1

Here it goes, remove the banana flowers and when you get to the stage you can remove anymore, just cut it in half. Use the petals which are soft. Discard those which has more fiber and can’t cut.

Ingredients:

Banana Flower and petals of medium size

Tamarind : a small piece

Salt : 1/4 teaspoon

Oil : 3 to 4 table spoons

Red Chili : 2 to 3

Asafoetida/Hing: 1/8 teaspoon

Urad dal :1/4 teaspoon

Garlic : 20 pods

Mustard seeds : 1/4 teaspoon

Water : as needed

Curry Leaves: Few

Method:

  • Throw the banana flower and the petals in a pressure cooker, add salt, tamarind and some water and cook for 3 whistles.
  • In a small pan, heat some oil, add urad dal, red chili, hing. Once it cracks, let it cool.
  • Take out the pressure cooked flower, petals, add the above and grind it to a fine paste.
  • Next heat the remaining oil, add mustard seeds and curry leaves.
  • Add garlic once they start to brown, add the paste and mix well.
  • Cook in low flame until it thickens.

Serve with idli/dosa.

My friend told me that , they prepare it for ladies who delivered babies. This helps cure the internal injury in new moms. As you know Banana flower is full of iron content. Though it is a little long process, it is absolutely worth it. This tastes so good. Do give it a try. You can store it for a week as we have loads of oil. Use it as thokku.

Share this:

  • Twitter
  • Facebook
  • Tumblr
  • Pinterest
  • Reddit
  • Pocket

Like this:

Like Loading...

Paal Payasam/Kheer

09 Wednesday Dec 2015

Posted by Malar in Food, Recipe, Sweets/Desserts

≈ 9 Comments

Tags

Desserts, easy kheer, easy paal payasam, Indian Desserts, Kheer, Milk Desserts, Paal Payasam, payasam, Rice Kheer

I have been MIA for quiet sometime again. December is going to be a very tight scheduled month. Having a baby has changed everything possible. My DD has turned 6 months old today. Just a few days back we started giving her some solids. As of now she likes avocado.

I was thinking of making a cake. But my hubby said, why don’t you make some payasam, so that she can also have a bit of it. So yes cake plan got cancelled and here is the simple paal payasam/kheer. Did she like it, to my surprise nope, she didn’t 🙂

paal_payasampaal_payasam_1paal_payasam_2

Ingredients:

Milk : 1 litre/4 cups (full cream)

Basmathi Rice : 2 tables spoons

Ghee : 2 table spoons

Saffron strands : Few

Sugar : 1/4 cup (adjust according to your taste)

Method:

  • In a small pan, take a teaspoon of ghee and roast it for a minute.
  • Once cool, just give it a pulse in mixie for the rice to break into half.
  • In a pressure cooker, grease with ghee.
  • Add milk, broken basmathi rice. You can crush the saffron strands and add along.
  • Cook it for a whistle. Stop and let it cool.
  • Once the pressure is relieved, open and cook in low flame.
  • Once the rice gets cooked, add sugar.
  • Cook in low flame for around 30 to 40 mins.
  • Milk gets thicker. Once it comes to thick consistency,stop and serve.

You can always use jaggery instead of sugar.

Full cream milk gives the best taste.

You can use heavy bottomed pan instead of pressure cooker.

Add some cardamom powder to enrich taste, I didn’t want to make it strong as I am giving my LO.

Add a pinch of salt to enrich taste.

Share this:

  • Twitter
  • Facebook
  • Tumblr
  • Pinterest
  • Reddit
  • Pocket

Like this:

Like Loading...

Cranberry thokku

02 Wednesday Dec 2015

Posted by Malar in Food, Gravy, Recipe, Side Dish

≈ 16 Comments

Tags

Cranberry Indian Recipe, Cranberry Indian style pickle, Cranberry Indian Style recipe, Cranberry Thokku, easy thokku recipe

I wanted to make this thokku last year itself but missed it. Cranberries are easily found during Thanksgiving season. When I went to Walmart before Thanksgiving this year, I got a pack of cranberries for $1.68. Last year this time I was pregnant and had urinary infection, which is very common during pregnancy. Cranberry helps a lot in reducing UTI. I used to make juice with apple. But it was too bitter and I gave up fresh cranberries lol. So I used to make dry fruits bar/energy bar with dried cranberries. This year again I got so tempted by seeing the price. Finally made this thokku. It is way better than juice, so you can try it ☺

This is not my own recipe, adapted from here. I have never found these beauties in India.

Cranberry_Thokku Cranberry_Thokku_1 Cranberry_Thokku_2

Ingredients:

Cranberries: 2 cups
Turmeric powder: 1/4 teaspoon
Red chili powder: 2 teaspoon (adjust according to your taste)
Salt : 1 teaspoon
Oil: 2 tablespoons
Tamarind juice: 2 tablespoons

Method:

  • Wash cranberries and set aside.
  • Heat oil in a large pan. When hot add the cranberries. It would start popping, just be careful.
  • When they bubble up and get cooked. Add turmeric powder, red chili powder, salt and give it a nice mix.
  • After 2 to 3 mins, add tamarind juice and mix well.
  • Let it cook and oil gets separated on the edges of the pan.
  • Now stop and cool. Store in a mason jar in refrigerator for 2 weeks.

It goes well with idli, dosa, chappathi and with rice.

Optionally you can make tadka with little oil, mustard seeds, urad dal, asafoetida, curry leaves. I didn’t want to add more oil, so didn’t do this step.

Share this:

  • Twitter
  • Facebook
  • Tumblr
  • Pinterest
  • Reddit
  • Pocket

Like this:

Like Loading...

Vegetable Fried Rice (Indian Style, without soy sauce)

23 Monday Nov 2015

Posted by Malar in Food, Recipe, Rice

≈ 18 Comments

Tags

Bachelor recipe, easy fried rice recipe, Fried Rice, fried rice without soy sauce, Indian bachelor recipe, Indian Style Vegetable Fried rice, Soy sauce free fried rice, Vegetable Fried Rice

When I get loads of veggies, on Sunday I opt for vegetable fried rice. My hubby would not want to use soy sauce. So here is a very interesting version with the usage of vinegar. It tastes awesome. My hubby gave me this recipe. We both love it. Hope you will also enjoy this.

Veg_Fried_Rice Veg_Fried_Rice_1

Ingredients:

Rice : 2 cups

Onion : 1/2 of a large finely chopped (yellow onions will go great)

Carrot : 2 small

Beans : 10 numbers

Green Bell Pepper/Capsicum : 1/2

Cauliflower : 4 to 5 florets

Peas: 2 to 3 tablespoons (I use frozen)

Spring Onion : 1 strand

Apple Cider Vinegar : 6 tablespoons (Normal vinegar would also work)

Salt : as required

Black Pepper Powder : 1 tablespoon

Oil : 2.5 tablespoons

Cinnamon Stick : 1 small

Bay Leaf :2

Cloves :2

Cumin Seeds : 1/2 teaspoon

Method:

  • Chop all the vegetables to small pieces.
  • Cook rice and set aside.
  • Heat oil in a large pan. When hot add cinnamon sticks, bay leaf, cloves, cumin seeds.
  • When they crackle, add onion, saute for 2 mins.
  • Next add carrot, beans and saute for 2 to 3 mins.
  • Add bell pepper now, saute for another 2 mins.
  • Finally add cauliflower, frozen peas saute it. Mix black pepper powder, salt.
  • Now add vinegar and mix. Let all the veggies cook. Finally add the spring onions cook for 2 mins.
  • Once all the veggies are cooked. Reduce the heat to low.
  • Mix the cooked rice.
  • Once all the veggies and rice gets mixed, check for salt. If needed add more and mix.

Serve hot 🙂 I like it simple raita, you can also make gobi manchurian.

For all other rice varieties, please click here

Share this:

  • Twitter
  • Facebook
  • Tumblr
  • Pinterest
  • Reddit
  • Pocket

Like this:

Like Loading...

Sweet Diamond Cuts/Shakkarpaara

17 Tuesday Nov 2015

Posted by Malar in Food, Recipe, Snack, Sweets/Desserts

≈ 20 Comments

Tags

Baked Diamond Cuts, Shakkarpaara, Shakkarpaara with Gulab Jamun sugar syrup, Snack With Sugar Syrup, Sweet Diamond Cuts, what to do with excess suagr syrup, Whole Wheat Diamond cuts

Hope you all had a wonderful Diwali. I just made some millet poha ladoo , murukku, gulab jamun. On Diwali day, managed to make some Masala Cheeyam as well.

For gulab jamun I used the instant pack. I had some sugar syrup left out . Its was flavorsome as I had added some saffron, cardamom, vanilla extract. Usually everyone adds rose essence, I didn’t have it, so I used vanilla extract. I somehow didn’t want to throw that syrup. Decided to make sweet diamond cuts with it. It came out awesome. A great tea time snack. I have made it with whole wheat flour. Again traditionally it is made with all purpose flour/maida and semolina/sooji.

I have not given any measurement as I didn’t use any. You can play around with the sweetness and the amount of flour. Also I have not used oil while making dough, as the gulab jamun would leave out oil in the syrup.

Shakkarpaara_1

Shakkarpaara

Ingredients:

Whole Wheat Flour/Aata

Sugar Syrup

Oil : to deep fry

Salt : a pinch

Water : in case needed to make dough

Method:

  • Combine flour, sugar syrup, salt and mix well.
  • Form a dough if needed add some water and make a firm dough.
  • It should not be loose and should be a thick one.
  • Set aside for half an hour.
  • Roll out with rolling pin and cut in to small diamond shaped pieces.
  • While rolling out as we are deep frying, make it medium sized not too thick nor thin.
  • Heat oil for deep frying.
  • When hot, slowly drop pieces in and let it fry. Have the heat in low medium.
  • Once done, remove and drain excess oil in a paper towel.
  • Enjoy with a hot cup of chai or coffee.

For baked and savory version, here is the link Baked Wheat Crackers.

Share this:

  • Twitter
  • Facebook
  • Tumblr
  • Pinterest
  • Reddit
  • Pocket

Like this:

Like Loading...

Samai, aval laddo/Little Millet, Poha Laddo

08 Sunday Nov 2015

Posted by Malar in Food, Recipe, Sweets/Desserts

≈ 15 Comments

Tags

Aval Laddo, Little Millet Laddo, Little Millet Recipes, Millet laddo, Moriya recipes, Poha Laddo, Samai laddo, Samai laddu

Happy Diwali everyone 🙂  This year being the first year for my daughter, it is quiet special. But these days I am rarely getting time. Preparing day to day food with her is getting challenging.Even if I prepare something taking picture is time consuming 🙂 So I made this quick laddo. I try to include millet in my diet as they are rich in iron. This is a basic poha laddo, with the addition of millet.

Samai_Aval_laddo Samai_Aval_laddo_1 Samai_Aval_laddo_2

Ingredients:

Little Millet/Samai : 1 cup

Poha/aval/Beaten Rice : 1/2 cup ( I have used red poha here)

Dalia/Pottukadalai : 1/2 cup

Sugar/Jaggery : according to your taste ( I used jaggery)

Ghee : 1/4 cup

Cashews : 10 to 15 numbers

Milk : 2 to 3 tablespoons

Method:

  • Dry roast little millet/samo, poha, dalia and grind it to a fine powder.
  • If you are using sugar grind it to a fine powder as well. I used jaggery, so I made a syrup and heated it.
  • Heat ghee in another pan, roast cashews.
  • Add ghee, jaggery syrup to the powder and mix.
  • Heat milk and mix with the above.
  • Form round balls when hot. If needed add more ghee.

As we are adding milk, this needs to be refrigerated. Stays good for a week.

Do check out some more Diwali recipes, Rice Kodubale, Sweet Somas/Gujia.

For Vada recipes to be prepared on Diwali, check here Uzundhu Vadai/Medu Vadai, Masala Vada/Paruppu Vadai

Once again Happy Diwali 🙂

Share this:

  • Twitter
  • Facebook
  • Tumblr
  • Pinterest
  • Reddit
  • Pocket

Like this:

Like Loading...

Samai Upma/Little Millet Upma – Guest post to Maha’s lovely home

04 Wednesday Nov 2015

Posted by Malar in Food, Indian Breakfast, Recipe

≈ 12 Comments

Tags

breakfast recipes, Little Millet Upma, Little Millets Recipe, Millet recipe, Samai, Samai recipes, Samai upma, south Indian breakfast, South Indian Breakfast recipes, Upma recipes

This is a very long pending post from me. I have given this guest post to Usha of “Maha’s Lovely Home” long back. When I was planning to post it in my blog, I had to go to labor. After that I couldn’t get time to post. So here it is. When Usha asked me to send some recipes, I planned to give her millet recipe.

Do visit her page to find lovely recipes. A very dedicated and talented blogger for a long time now. You can check my recipe in her page too.

Millets have a lot of health benefits and they can be prepared similar to Rava. They are gluten free as well.
Samai_Upma Samai_Upma_1 Samai_Upma_2

Ingredients: (Serves 2)

Little Millet/Samai : 1 ½ cup

Onion : ¼ of a large

Green Chili : 2 (adjust according to your taste buds)

Ginger : ½ inch piece grated

Mixed Veggies : ½ cup ( I have used frozen, you can use fresh veggies)

Salt : as needed

Water : 4 1/2 cups ( 1 cup samai requires 3 cups water)

Oil : 1 ½ teaspoon

Mustard Seeds : ¼ teaspoon

Urad Dal : ¼ teaspoon

Channa Dal : 1.4 teaspoon

Curry Leaves: Few

Cilantro : to garnish

Method:

  • Soak Samai/Little Millet in water for half an hour. Drain and set aside.
  • Chop onions, green chilies.Heat oil in a pan, when hot add mustard seeds, urad dal, channa dal.

    When they turn golden brown, add curry leaves.

  • Next add onion, green chili and saute till translucent.
  • Now add the frozen veggies, saute till half done. Frozen cooks faster than fresh.

    Next add water and let it boil. Add salt to it.When it hot enough, add the drained samai and mix well.

  • Cover with a lid and cook till soft and water gets dehydrated.
  • Garnish with chopped cilantro leaves.
  • Serve with any chutney.

To check out some chutney recipes, see below

Peanuts Chutney

Celery Chutney

Onion Chutney/Vengaya Chutney

Ginger Chutney/Allam Pachadi

Coconut Chutney

Peerkangai Thol Thugayal/Ridge Gourd Skin Peel Chutney

Share this:

  • Twitter
  • Facebook
  • Tumblr
  • Pinterest
  • Reddit
  • Pocket

Like this:

Like Loading...

Karuvepillai Kuzhambhu/ Curry Leaves gravy(Chettinad style)

30 Friday Oct 2015

Posted by Malar in CHettinad food, Food, Gravy, Recipe

≈ 14 Comments

Tags

Chettinad style karuvepillai kuzhambhu recipe, Curry Leaves gravy, Curry Leaves Recipe, Karuvepillai Kuzhambhu, Kuzhambhu recipe

Karuvepillai kuzhambhu is a speciality in chettinad cuisine. Curry leaves are great source of vitamin and mineral. High in iron content. Here in the US just few strands of curry leaves cost a dollar. I just use them for garnish. Recently there was an Indian friends get together. One family have got this tree at their house. They had to chop it off. So they distributed it in the party. I was overwhelmed seeing so much of curry leaves lol. Immediately called grandma to get kuzhambhu recipe. They were simply fresh and had awesome smell. After making this kuzhambhu my house was smelling divine 🙂

Here it is….

Karuveppilai_Kuzhambhu Karuveppilai_Kuzhambhu_1 Karuveppilai_Kuzhambhu_2

Ingredients:
To grind
Curry leaves/ Karuvepillai: 1 cup tightly packed
Fennel seeds: 1 teaspoon
Grated coconut: 1 tablespoon

Tamarind juice : 1.5 cups
Sambar powder: 2 tablespoons
Turmeric powder: a generous pinch
Salt : as needed

Oil: 1 tablespoon ( I prefer sesame oil)
Mustard seeds: 1/4 teaspoon
Fennel Seeds :1/4 teaspoon
Urad dal: 1/4 teaspoon
Fenugreek seeds : 1/4 teaspoon

Method:

  • Wash curry leaves, add fennel seeds, grated coconut and grind it to a fine paste. Set aside.
  • Add tamarind juice, sambar powder, turmeric powder, salt in a bowl. Now mix the above ground paste.
  • Check if salt and spice is fine, if needed adjust.
  • In a large pan, add oil heat in medium flame.
  • When hot add mustard seeds, fennel seeds, urad dal, fenugreek seeds.
  • When it splutters, add the add mixed items and let it get cooked.
  • It takes around 20 mins. When oil oozes a bit, then it is done.
  • Stop and serve with either rice, idli or dosa.

This can be stored for around a week.

Share this:

  • Twitter
  • Facebook
  • Tumblr
  • Pinterest
  • Reddit
  • Pocket

Like this:

Like Loading...

Potato Fry/ Urulai Poriyal

29 Thursday Oct 2015

Posted by Malar in Food, Recipe, Side Dish

≈ 10 Comments

Tags

Bachelor recipe, Indian bachelor recipe, Indian Style Potato Fry, Potato Fry, Urulai Kilangu varuval, Urulai Poriyal

We all love potatoes, who doesn’t 😛 . This is an universal recipe in many Indian families. Quick and easy to make. It is not there in my blog yet. So I thought why not take some pictures one day when i prepared. So here it is. There is one secret ingredient which brings more taste to this dish. I got to know from my dear friend Vidya @ Traditionally Modern Food. It gives crispy and tasty potato Fry.

Potato_Fry_1 Potato_Fry

Ingredients:

Potato: 2 to 3 medium
Oil : as required to fry
Mustard seeds: 1/4 teaspoon
Urad dal: 1/4 teaspoon
Cumin Seeds: 1/4 teaspoon
Curry leaves : few
Rice floor: 1 tablespoon
Salt : as required
Turmeric powder: a generous pinch

Method:

  • Slice potatoes to small pieces. Put the sliced pieces in water to avoid getting dark.
  • Heat oil in a pan, when hot add mustard seeds, urad dal, cumin seeds.
  • When they crackle, add curry leaves. Once they splutter add the sliced potatoes by draining the water.
  • Saute for 3 to 4 mins.
  • Next add the rice flour, turmeric powder, salt.
  • Mix well and let it cook. If needed sprinkle water and cook.
  • Once done, stop and serve.

Rice flour gives crispiness and an excellent taste. It can totally be avoided in case you don’t want to use.

Share this:

  • Twitter
  • Facebook
  • Tumblr
  • Pinterest
  • Reddit
  • Pocket

Like this:

Like Loading...
← Older posts
Follow Malar's Kitchen on WordPress.com

Enter your email address to follow this blog and receive notifications of new posts by email.

Facebook Page for Malar’s Kitchen

Facebook Page for Malar’s Kitchen

Follow me on Twitter @malarskitchen

My Tweets

All Cooking Sites

All Cooking Sites

Indi Blogger

IndiBlogger - The Largest Indian Blogger Community

myTaste.in

myTaste.in

SheBlog

Smart Indian Women

Very Good Recipes

Very Good Recipes
You can find my recipes on Very Good Recipes

Taste Query

Tasty Query - recipes search engine

Snapshots

This slideshow requires JavaScript.

Categories

  • Awards
  • Baking
  • Beverages
  • Biriyani
  • CHettinad food
  • Food
  • Gravy
  • Guest Post
  • Health Tips
  • Indian Breakfast
  • Paratha/Roti
  • Recipe
  • Rice
  • Side Dish
  • Snack
  • Sweets/Desserts
  • Tips
  • Uncategorized

Archives

  • January 2018 (1)
  • December 2017 (1)
  • April 2016 (1)
  • December 2015 (3)
  • November 2015 (4)
  • October 2015 (3)
  • May 2015 (1)
  • April 2015 (10)
  • March 2015 (9)
  • February 2015 (12)
  • January 2015 (11)
  • December 2014 (2)
  • November 2014 (3)
  • October 2014 (12)
  • September 2014 (20)
  • August 2014 (25)
  • July 2014 (31)
  • June 2014 (24)
  • May 2014 (20)
  • April 2014 (8)
  • March 2014 (11)
  • February 2014 (5)
March 2023
M T W T F S S
 12345
6789101112
13141516171819
20212223242526
2728293031  
« Jan    

Foodie Blogger

The Foodie Blog Roll

Create a free website or blog at WordPress.com.

Privacy & Cookies: This site uses cookies. By continuing to use this website, you agree to their use.
To find out more, including how to control cookies, see here: Cookie Policy
  • Follow Following
    • Malar's Kitchen
    • Join 380 other followers
    • Already have a WordPress.com account? Log in now.
    • Malar's Kitchen
    • Customize
    • Follow Following
    • Sign up
    • Log in
    • Report this content
    • View site in Reader
    • Manage subscriptions
    • Collapse this bar
 

Loading Comments...
 

    %d bloggers like this: